Pages

Thursday, January 3, 2013

How to make and use a swarm trapping box

The Swarm Trapping box.

The essential tool for every beekeeper. Swarm collection  boxes are a little known tool, that have many advantages. Essentially they allow a beekeeper to catch a large swarm and hold it in a safe, sealed environment, that is natrually cooled, until they can be transfered later in the day to the suitable nuc or hive.


How it works

Swarming bees have natural perpensity to migrate or move towards dark holes! so basically if you put a box or tube above a swarm, theres a strong likelyhood they will move in to it! 
Swarms hang on trees for the main reason to leave the hive, rest somewhere nearby in case of bad weather and send out scout bees  to seek a new place to colonise. During this time we see the classic swarm hanging from a tree, on a building, washing line etc. This gives us that window of opportunity to capture the swarm either by shaking it in to a box, swarm catching box or hive. However, if its a difficult  access, the this box could just get you out of trouble.
You can just place the box somewhere just above the centre of the swarm, then leave them settle for a few minutes. You can give a couple of puffs of very light smoke to the edges and this may just help edge them in to moving up.

If you have no Nuc and you simply shake your swarm on the ground then you can simply place the box over the top of the swarm and they should, after a few moments of confusion start to fan on the front landing strip to draw the others in to the box


My first  swarm trapping box!


Size:  60cms x 30cms x 30cms.

Materials: (top square with handle) 16mm exterior ply. The main body 1.5 to 3 mm exterior ply. A good quality wood adhesive with grab action necessary. Corners: and edges are made from corner beading. Doors 1.5mm ply with various sized pieces of square and u shaped beading for the door runners. Mesh screening for the ventilation doors.
Cost: approximately 40euros.
Advantages:   
Light weight. Gives you total flexibility. You can hold a small or large swarms. No need to put the bees straight in to a heavy cumbersom nuc of hive. You can charm the bees in to this box on a ladder, in a tree or in places where the normal nuc is just not practical.
No need to carry a nuc around . Typically you will have your used your spare nuc that moring and havent had time to get another hive from your shed!
The box itself is big enough to take all the rest of your gear including Smock, smoker, fuel , bee brush and hive tool so if  have that all ready,all you need do is keep it handy, in the back of your car.

Disadvantages

This box is very difficult to construct and is very time consuming!
Once bees are in the box bees need to be transfered in to a hive within hours, as they will natrually start to draw comb inside the comb.


As with all transfer of swarms in to hives or nucs, by putting a swarm in to its non permanent position you are by choice, risking damage to the queen and  or its colony, as you will subsequently have to transfer it to its final position later on.  However with a little experience in handling swarms you can very easily avoid over handling and minimise the possible damage and loss to bees.


Click on the link to see the box in action


Construction.
Ok, like i said this is not an easy build. I didnt take pictures during my first go at making this box, just as well really as it was a bit of a disaster. I recomend  you start with the top handle end piece of ply and using panel pins and glue, you attach one of the four sides. Then when thats dry, attach then next ajoining side, but support it as you first attach it to the handle end.
You are then left with the first long corner/ two sides pieces to join. Do this with great care, plenty of glue and i recomend you avoid using panel pins apart from on the handle end.
Use  grab adhesive and let it dry. It will be super strong when dry, but let it dry completely before attempting the third and fourth side. When the fourth side is attached , this will  need to be glued along the two remaining edges but take your time, its very difficult to get right before you push the two sides , glue and corner beading together, but once this dry you can then proceed to all the parts, without worry.
You will be surprised just how strong this box already is.
The rest is common sense.
There are two ventilation holes  you need to make in opposite sides of the box.
Once the swarm is inside and the bottom is closed off you can open the two holes up, exposing the bees behind the mesh, fresh air will enter in to the box from the lowest hole and exit  by the highest hole.  The biggest problem with transporting swarms is overheating in the transport stage if no ventilation is given to the 10,000 or so bees!!

I have posted loads of pictures of the box if you wish to try and copy it.
If you have any further questions then the please dont hesitate to contact me. It really is a tricky one to make. not quite as bad as a bee lining box, but not far off!


Base showing door section runners on 3 sides.


Bottom door in place. Note, when front tray is in contact with the third and rear runner, the front door is still ajar by about 1.5 cms. This created the perfect access for the bees, a nice small landing area with good access i and out of the front and none anywhere else.


Internal View of the box. you can clearly see the off-set ventilation doors


The front totally closed . I have a simply pin that joins the two front wooden blocks, thus closing and locking the front  of the box. 


Side ventilation removed


Reverse view of lower door.


So if you manage to get all the above right and believe me its a challenge, you are ready to put it to use.
I have also posted some pics of swarms I have caught and also my beekeeping teacher  has allowed me to publish for the purposes of demonstrating this box.


Swarm on top of a bee trap
This happend last summer. A swarm arrived at my trap, obviously the queen didnt want or like the look of what her scout bees guided to, so they all settled on top of the box.
I returned a day later after discussing this problem with my mentor and he suggested brushing the bees in to the box if they were still on the box after a day. This i tried and they all took to the air to my disbelief! They circled the garden and then fortunately landed on a shrub in the garden in and ideal swarm shape.


 I then shook them in to the box, put the lid on but not closed, turned it over slowly over about 20 seconds and placed it on the ground. Immediately the bees started fanning, indicating the queen was in the box and that they were all happy with the new environment.


Back at the apiary I gave this queen and colony the white sheet method, I gave them a different nuc, that would have had a different smell, knocked the bees out of the box and just let them walk in to their new home which worked well, without the swarm catching box i would have struggled to secure the swarm.


Swarm lands on raspberry branches.
This time the branches, nearly on the floor were bent down between two bricks for extra gap between the grass and the box and the bees simply  went up in to the box.


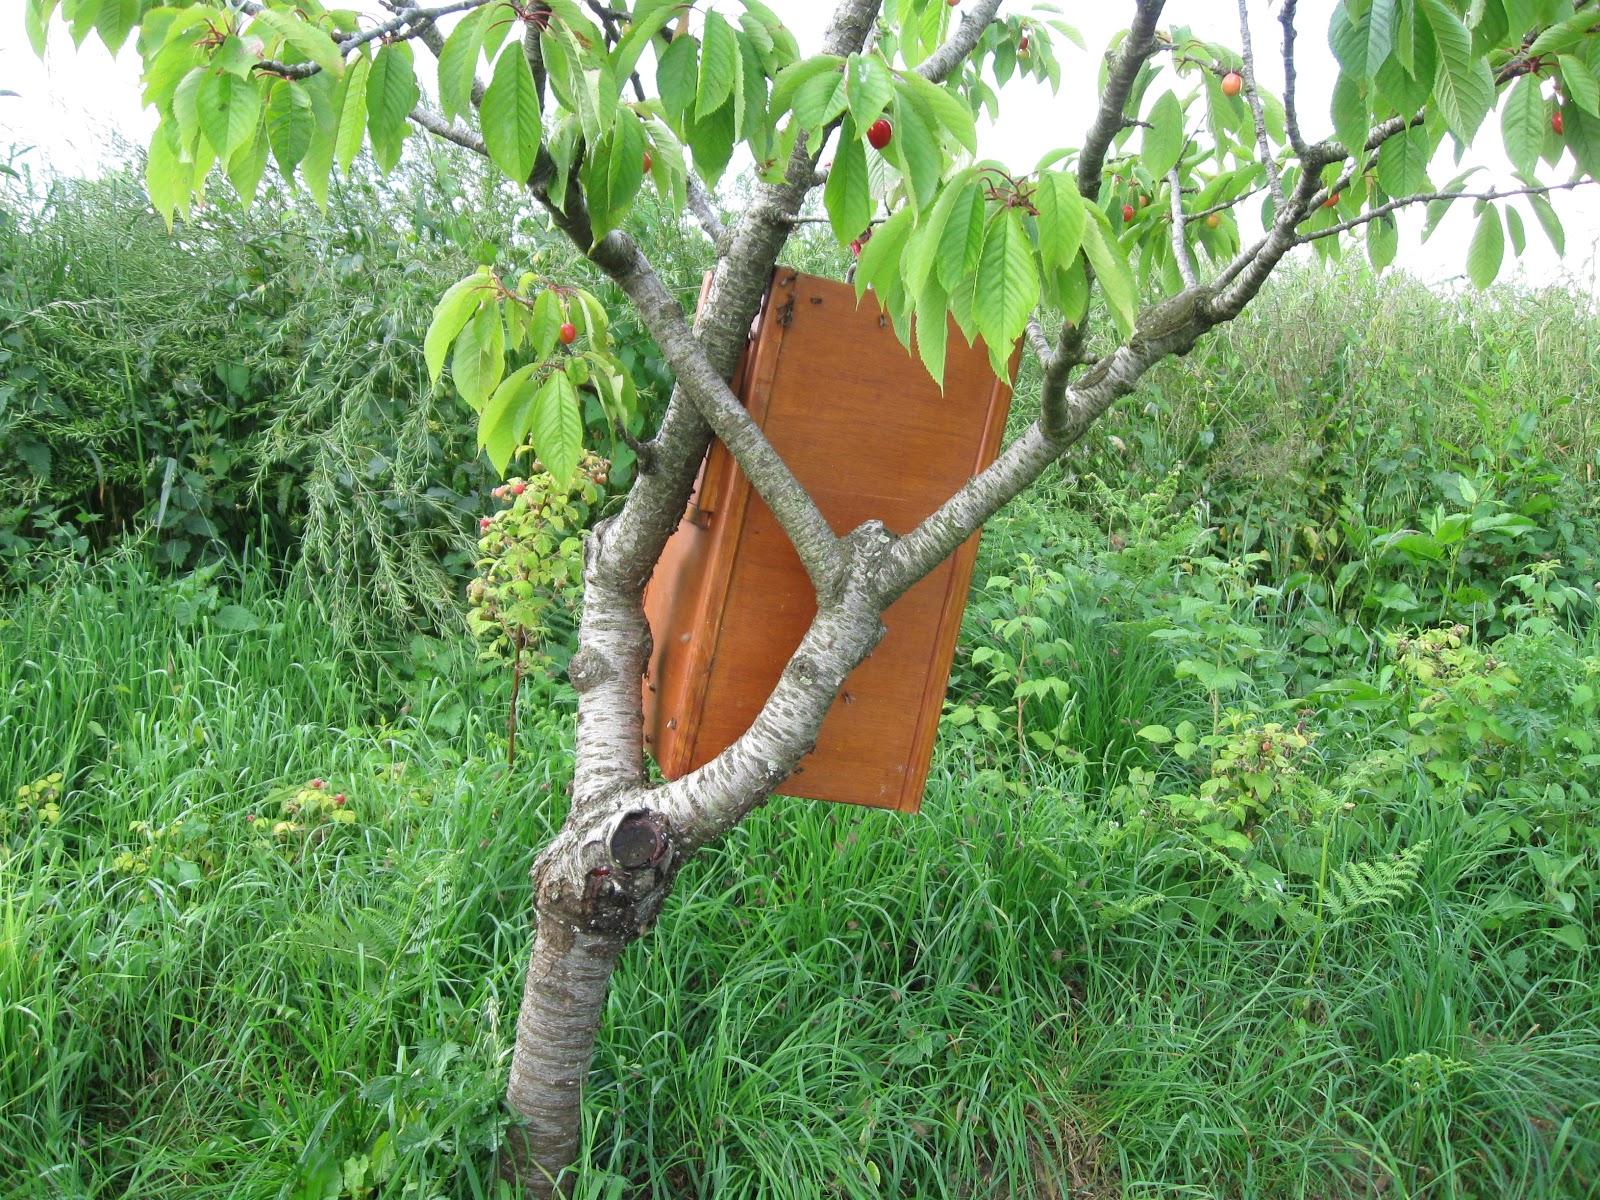
Swarm found around the base of cherry tree
This next sequence of photos shows the swarm before , the positioning of the box and  the subsequent transfer of the bees in to the box.


 The box in hung with the opening, just about one third from the top of the swarm.


All Bees inside, time to close off the bottom door and open up the side vents.
Closing off the bottom tray is a dilema, but normally you will loose no more than 10 or 20 bees. If you are not sure when to close of the door, then wait a little longer until more are in, but beware! they may change their minds  and abscond at any time,leave the box and settle elsewhere, so be warned! Generally though they seem to want to settle for a while, making this easy.
Best of luck! Many thanks to my beekeeping teacher, Mr Charles Basset, for allowing me to use some of his pictures and video!

Pictures here Charles captures a swarm on a washing line. Beautiful swarm!!!!


Saturday, November 3, 2012

Swarm trapping report 2012

Swarm Trap report 2012 season

Good swarms were issued in this year and of a fair size, considering the poor foraging conditions and general    bad weather.
Swarms were issued in general, in typical style, with bad weather for the previous few days and then swarms issuing in  the following brief  period of better weather.

Very good sized swarm! They don`t come much better than this!


In all I set 23 traps and caught 7 swarms. Thats not a very high percentage , but if you were to offset the cost of the swarms you had caught, against your materials for the season, then you could say they more than paid for your expenses.

I tried new places to set my traps as well as placing some traps in places I had caught swarms before. In all I was very pleased with the success rate, a swarm of bees is more valuable to me than the money it may generate from its sale.

Swarm Size

The size of swarms this year has been generally good.  It is a matter of debate over the conditions that give rise to larger than average swarms over a particular season.
For me it is a combination of things. Obviously the avalibility of food is one thing but i have a theory that if there`s plenty of of food avalible,  yet the number of bees out foraging hard is not large and the food brought back to the hive is done so without larger than average mortality to the hive, then this would help in above average swarm size, Another thing to mention is that we actually had good weather between March to the middle  of April which would also give a good start to the spring build up. Pollen, coming early in abundance, stimulating the queen in to spring laying mode, higher than average laying patterns, which may also give rise to above average size swarms casting in May and June, providing that that incoming food stayed the same levels.

Weather problems and disaserous reqeening

Assuming that generally most swarms issue due to the fact that the hive is over populated and  the queen is more than likely to be in her second or third year, most swarms inevitably  requeen  after establishing a new colony.
This year has been a disasterous  year for re queening.
Essentially, as I have previously said, many hives swarmed at my apiary, due to the good size of the colonies and the feeding and treatment i have given them over the early spring. However the weather was so atrocious from mid April onwards, that the re queening in most cases failed. Swarms from my hives and my swarm traps were parallel in the re queening problems.
from mid may onwards the weather had been so poor, that emerging Virgin queens would have struggled to find enough good days to complete their mating flights, as well as enough males to mate with successfuly in the small window they have to complete their nuptules.

Many times this year, I have opened a hive to see if a new queen had started to lay only to find a colony of disorganized bees running around the frames noisily, with no eggs , or brood. I also often found a virgin queen from time to time, and in a couple of hives saw the same virgin queen, over a three week period.
Obviously completly unable to mate due to the diabolical weather that plagued us until mid july. MOstly the hives became drone layers with in a couple of weeks more and  the hive was lost.
Due to this requeening problem, my beekeeping teacher thinks that in this summer as much as 30% of wild bee colonies could have died out altogether. This is obviously very bad news for our wild or feral colonies here.


Next Year

Well I have already a good idea of where most of my 30 swarm traps are going to go next year.
In fact I wish I had more nucs that were old and smelly enough to use, but i only have 38 in total and need to leave some availible for other jobs, such as artificial swarming in the spring.
Use your winters wisely, make up Nucs, prepare your material for next year, make up frames  and disinfect  your old hives with a bow torch.

Take a drive out to see possibe swarm trapping sites. It may take more than one tip to a homeowner to convince them that putting a swarm trap in their garden is a cool thing but recently i have found that most people are really excited about the idea.!!

On the positive side, I lost about 7 swarms or colonies this year so i have plenty of draw up frames for my swarm traps next year. so its not all bad news!!

I will post pictures of my swarm traping box in the next post, with detailed pictures for its manufacture.
Its a really simply but cool piece of kit if you don`t have a nuc box spare. Worth the time it to build


Bees using this cool swarm traping box  for their new home!


Richard


Thursday, September 13, 2012

Honey, Phacelia and the dearth!

Hi, Well I have completed my honey harvest in the first week of September and sorry for not posting sooner but I have been just so busy of an evening.
The harvest was very small but it is of excellent quality.

I harvested 6 honey supers, but none of them were full and ended up with 33 pots of honey.Thats just over 16 kilos.
It may sound a lot but after you have given a pot of honey to everyone who called you to collect a swarm in their garden, or friends who had swarm traps in their gardens, you don`t have a lot left, but the quality of the honey this year is extremely good. I dont have a moisture meter but I think it is borderline on the high water content and it is very runny, but it tastes soooo good!

I have some pictures of the extraction method.

Decapping: This is the slicing off of the top wax cap of the honey comb to reveal the honey beneath.

Please excuse this old picture, during my first honey harvest.

The wax capings then are left to be washed at a later date, with the water from the washings fed back to the bees. The wax of course is of excellent quality and reasonably pure and needless to say has endless uses. 


Next the frames are loaded in to the extractor. Depending on the size of your extractor, then the more frames you can spin at once.


 This is an electric radial spinner, so the frames don`t need to be moved around and spun each side, they are still spun in both directions.


Short Video of the machine in operation.


 Hey presto, Honey comes out of the bottom. It goes directly through 2 grades of sieves and in to a bucket for collection. From there it goes in to a maturator or settling tank, where all the tiny bubbles come to the surface over a few days and then its finally ready for jarring or bottling up.
This years honey should stay as a liquid for a long time before it finally starts to crystalize towards next spring.


 The late summer dearth has arrived.

The summer dearth has arrived, with only a very few flowers around. We have had a few, very dry weeks since it stopped raining in mid july and subsequently the gound is like concrete.
Fortunately, the phacelia I sowed at the end of the rains, came up quickly and is now in full flower.
My bees love it and its a joy to watch this blue swath alive with bees of all kinds, not just honey bees.

The ivy should start to flower in earnest around the end of next week so my bees will have had a good  food source, just when they needed it. After the ivy has finished the bees start to rely on the reserves they have got stored away, because theres not a lot  around until the hazel  and willow start flowering in february. Autumn is starting to draw its golden blanket and things are starting to loose their summer colours,


Bees On Phacelia


Tomorrow I am off to try some Bee lining , and ancient method of finding wild bee nests. I only want to find them so I can place my traps at the right distance from them next year, in the hope of optimising my swarm catching chances.

Richard.

Saturday, August 25, 2012

Bee Nest Cut out at Callac.

Cut out of bee nest from start to finish.

I had a call from a couple who lived near the town of Callac.  They had a bee nest in there wall for just over 2 years and were looking for someone to possibly remove the bees, as unfortunately they were becoming a bit of a nuisance. Not surprising really as the nest entrance was only about 2 meters away from their front door. I was amazed they had tolerated it there so long!
I then wanted to be sure that If I was going to drive the 145 mile round trip, that the bees were in a cavity behind this old bricked up window and not in a plasterboard cavity behind that, making extraction virtually impossible

The answer I wanted arrived and luckily it was concrete render inside (behind the nest) so there was a pretty good chance that the nest would be easily accessible through the front window.

Just for reference the owners of this property had taken a photo of the swarm, as it arrived at the hole in the wall of their house. They arrived on the 24th june 2010, so they have been there 2 years and have probably swarmed as least  once.


This is the picture of the new entrance  before I started the extraction, as the bees had moved their entrance to the above right of the supporting lintel. 


You can see clearly in this picture , the proximity to the front of the house, even though there was a small glass conservatory over the front door, it was always a task just getting in to the property through a haze of bees! You can also clearly see the window outline.


Before doing anything else I smoked the bees 3 times heavily, I was pretty sure that this wouldnt drive then anywhere but out of the nest before going back in again, only to gorge themselves on honey, making my job a whole lot more pleasant.

 Part one was  to hack out the existing masonry, after firstly explaining to the home owners that this is what we call "deconstruction". You should always get the property owners consent prior to any work that may cause damage to a property, even if you are removing a nest of bees.
The masonry was luckily very loose, and once I got going it came away easily to reveal a wonderful sight of the front of the nest.


You can see mainly smaller pieces of comb in the front of  this nest, with the larger slices of comb being situated behind. Its basically a matter of space and the bees had built in around the space available.


The smaller rubble sized pieces of stone were all glued together with propolis, sealing up the lower part of the nest as well as stabilizing  the whole area by sticking everything together.


After removing the first few sections of  drone brood comb,  I then got stuck in to the real larger sections of brood comb. I managed to cut each section away at the top, then carefully grab each piece , so it didnt fall to the ground and cause the bees to get very angry and possible damage the queen if she was there to be found on the brood comb?
.
Incredibly on the third piece of comb, their she was, a beautifully shaped queen with a really good sized abdomen. Its one of the signs of a healthy queen. I had put my queen clip in my pocket at the start of all this, just in case by fluke I did manage to see the queen. 20 seconds later it was in the bag and she was in the clip.
Once you have the queen safely captured, the colony is relatively safe, no matter how bad things go from then on.


I, like many others like to use the elastic band method of holding in the comb.  After a few days the bees normally chew their way through the bands, but normally by then they have also built new comb and glued all the old pieces to the frames.
Incidentally, I had also tied the queen clip containing the queen, to one of the frames.


This was the largest section of brood comb, spanning the whole length of the cavity, which I estimated to be be between 40 and 50 litres. Each time I removed a section of comb, I brushed all the bees off in to the hive, as many of these bees were nurse bees and happy to stay with the brood nest and its odour.


By this stage You can see at the top, all the sections of comb that I had cut away, crossing the roof sections from left to right. Behind all the brood was the honey comb. There was several large slabs of this which is what I would have expected in August. Not a huge amount but about 10 kilos. When you get to the honey comb you need a good sized bowl of water at hand to wash your gloves in, each time you cut out a section.
This is essential for keeping things clean other wise  you cannot touch anything as you gloves are totally coated.


Now I have removed the nest, placed all the salvageable comb in to its frames, together with a large amount of bees. Each time I smoked the cavity a lot of bees migrated from the inside of the roof to the outside entrance hole, so what I needed to do was stop the going back in to the old nest site.


There was also, while all this had been going a lot of foraging bees returning from their duties to find the nest in turmoil and all these bees were landing at the existing entrance. So in  an effort to capture these bees  I liftes up the nuc box and rested against the wall, just to the left of the existing entrance hole.


Bees returning and clustering  around the existing entrance.


What I did then was to smoke all the bees out and then block of their entrance , so the bees would naturally look for another way to the nest and then find the new entrance to the left of its existing place, with their queen inside.

This seemed to work a treat, and very soon more and more bees were slowly making their way in to the nuc.


From the next 3 pictures you can see the amount of bees around the entrance way reducing in numbers, as the number of foragers returning was quickly reducing with the onset of the  evening.


The majority of bees , now inside the box.
It is at this point when you have to make that decision, close up and go. I had the queen, a large amount of brood and comb and a lot of bees. so I dropped the front lid and they were in.
Its also important to take a breath at this stage. Trying to lift down a heavy nuc full of bees, at the end of a long hot afternoon is sure to be a recipe for disaster, with all that work ruined if you drop that nuc.
Fortunately all went well except I forgot i had not used this nuc for transporting bees before and during the 90 mins journey hope I had to battle my way through bees escaping through a small hole and flying around the car, which meant I got stung by my eye, which always makes me look as though I have had a stroke.
This was the second sting \I had got the whole day, the only other one being on top of my bum whilst bending over Lol , one nill to the bees!


So I got the nuc back to the apiary that evening, opened up the hive and let out the queen from her clip
The next morning I put on a feeder and let them get on with it. Its late summer and they would need time, good weather and sugar to rebuild their nest.


1 week later

I opened up the hive to my relief, quite a well organised repair work  going on.
Lots of pieces of the original comb that I had tied in with the rubber bands were being extended and welded to the side frames as they were also gnawing through the supporting rubber bands rapidly, with only a few remaining.


You can see the original piece of comb on the right (much darker in colour) and the newly constructed piece to the  upper left in clean white wax and also joined to the frame.

I have to say this is a really interesting way to learn about beekeeping. If you ever get the chance of doing a cut out then I would recommnend you have a go. Its a load of work, but the rewards are there.

Very many thanks to the home owners Dee and Keith for letting me remove these bees.
It was a a real pleasure to have this rare chance of seeing a wild nest as well as saving the colony.

Its not always possible to save a colony,  if they are  in a chimney of in accessible area, but in some cases it can be done.

I will be adding a video, as soon as I have sorted out the editing.
Richard


Friday, August 10, 2012

Swarm from an Artificial swarm? What!

Could not believe my eyes, when I passed my apiary last sunday morning. A swarm was issuing from one of the nucs that was an artificial swarm,  made some 16 days previously!


The swarm settled about 4 meters, away on a sloe bush ( blackthorn)

16 days is the key numbers here! Thats the time taken to build, feed and pupate a virgin queen.
I think the only explanation I can come up with is that I know the hive was packed full of bees at the point of artificial swarming . The mother hive or donor hive was the only hive that has started drawing up 2 honey supers, meaning it had a lot of foraging bees that came home to discover that their home had shrunk and the queen had gone without leaving queen cells.
 You may also say well, "perhaps the  swarm is because the existing queen from the donor hive, stayed on a frame that was transfered to the nuc?" so to avoid this problem of not being sure, I checked all the donor hives the week after and was pleased to find newly laid eggs in all the hives, so that that theory put to rest!

The bees had  immediately made emergency queen cells and 16 days later and  with the weather being excellent the first queen cell opened and a virgin queen climbed out of her guarded cell to find a very full hive packed with bees, pollen and honey.

At this point she must have chosen to swarm. I think therefore you could call this a "cast swarm" due to the fact that it was a swarm  with a virgin queen and not a prime swarm leaving with the existing queen.
The difference being that you should`nt expect to see any eggs from this queen for at least a week or 2, As she has to go off and mate, then return to the colony and start laying.

The weather since has been excellent but I am still not going to interfere with the hive. There`s just no need!


Click here to see the video


As soon as I had collected the swarm and hived it, in to a nuc and then placed in a space of its own, but next to the hive it came from, in case they decided to leave the hive if they were queenless. They would then probably all craw, back in to their previous hive.

I immediately then went in to the hive and looked at the state of the rest of the queen cells. None of the others had hatched out, and the one that had opened must of been the one that left the colony and it was unlikely that she would have stung through the sides of the other queens cells if she was going to swarm!
I quickly had a think and decided that I could use a few spare virgin queens, so I cut out a cluster of what semed to be 5 and left another 3 on the other side of the frame. That should at least leave enough to leave the nuc a good queen.
I didnt have a container, so I just put the queen cells on my seat. A few minutes later my son sitting in front of my truck, started yelling, saying "theres a bee on the seat." Turns out it was one of the queens that had just hatched out and was crawling around looking for a colony to join!

This then got me thinking about the other hive that was very slow to requeen. so I picked her up and put her on the entrance to the queen less colony and in she walked.
This is one method of re queening without using a queen  introduction cage. This virgin queen has very weak pheromone smell  and or of an existing colony and its the only time that a colony of bees may accept a queen ( virgin) in through the front door.
The other benefit of this spare virgin queen, is that if the hive had re queened then the virgin queen probably would not be  accepted of killed by the much stronger dominant egg laying queen. So nothing to loose.

The remaining queen cells, I put in to separate jars, as one more had hatched out on the way home and they need to be kept apart, before they try and kill each other!
I phoned my beekeeping teacher , who like me, had lost hives this year due to poor re queening after swarming, who was around to collect them within an hour, most grateful for this rare gift of spare queens in late august!
A great result. I got to see a swarm issuing from start to finish, caught the swarm, and also got  spare queens to requeen queenless hives! all luck that I was there to see the swarm come out of the hive as other wise I wouldnt have known where it had come from, thats if it stayed in the tree for long enough for me to spot it.
I am very happy!

Coming up: A cut out of a wild  honey bee nest at Callac, Video to come later, when editing is complete.


Thursday, August 2, 2012

Late swarm, bearding bees and drone comb

Late swarm.
Caught a late swarm in this trap in the hot spell last week. It must have issued the first or second day of the really hot weather. The trap in about 1,2 meters off the ground, facing  North, but it does get the sun for most of the day.I checked the trap about 10 days before and there was a few bees checking it out but not in large numbers, so it was a very nice surprise.
 Not an enormous swarm but nice size,  that will get away well. The queen had already started laying and there was already a remarkable amount of pollen and honey stored in the centre frame which would indicate they have been there for at least a week. Normally one may expect a few swarms around the beginning of July but not really at the end of the month. This is a clear indication of  just how bad the weather has been over the spring and early summer with  the nectar flow still running well in to late July.
This swarm will stay in this nuc until next April, because it is unlikely to draw up enough comb and store more than five frames of provisions before the onset of autumn and  before the queens start to slow down her laying frequency .Also it is easier to heat and manage a smaller area if you have a smaller number of bees in the hive. Its all a matter of economics. They are capable of existing as a very small colony in a large hive for overwintering, however the odds of surviving the winter are less in a larger space.


Supersedure
The other thing to remember is that with all swarms, it is likely that  the queen is in her second year and she may have swarmed due to her coming to the end of her life.
If this is the case, hopefully the current queen will have started laying eggs in her new home and the new colony can become established before  the old queen dies or becomes weak,  leaving a window of opportunity to supersede the current queen or make emergency queen cells in the event of her sudden death.
For both kinds of queen replacement bees need eggs that are less than 3 days old. If no eggs are available of that age, then the colony is lost. Its also one of the main reasons why so many swarms die after swarming.
The queen is lost or exhausted by the swarming process or she dies shorty after esatabishing a new colony but has not started laying yet.


Bearding bees

Due to the hot weather all three of the recently created artificial swarms  have struggled with the temperature. 
The reason for this is that during the process of creating an artificial swarm, you move your existing hive from its existing position, to another place and subsequently all the flying bees make their way back to the nuc in its place, and always struggle for space but it is necessary, as the more the bees confined to this small 5 framed nuc increases the chances of successfully raising a new queen for the colony.
On hot days you will often see bearding where, bees have to leave the hive in an attempt to help regulate the temperature within the colony. Very often they will beard in the day and return to the hive in the evening when things cool down. Its actually a good sign of  hive management.


Drone brood comb

I wanted to show this picture of some Drone brood comb that I took out of a recently failed hive, that had failed to re queen successfully. Typically to the outer frame, was this beautifully constructed gallery of  drone brood comb that had since hatched out, but a good example of just how different brood comb is from normal worker brood. Many people cut out drone brood from the hive, as it is really a waste of resources to produce drones in the hives we look after, but in the big picture your own drone brood may not be made to produce drones for mating with your queens, but bees are genetically built to produce drones to ensure that there is always a pool of drones to mate with.  Drones are usually around from about mid april to about october, peaking in numbers around mid August, before all the drones are booted out of the hive as the colony prepares for overwintering. They get rid of any possible drain on the colony and obviously useless males are the first to go.! This gets my wife`s vote!


Drone brood raised above the normal  cells of worker production.