Pages

Friday, January 6, 2012

Hives, Honey Supers, Mini Hives and Nucs.

Taking a look at the parts that make up a hive


I have taken a series of photos in order that if not already, you become familiar with the components that we use in beekeeping. It is important you know the basics before you start your beekeeping practices.
Good knowledge of the individual parts will enable you to  carry out the best management  and manpulations for your hives, in turn giving them the best conditions to proliferate. Get it wrong and you can "stall" your bees and effectively put on the handbrake on the hives development.

Hive base

The picture below is a hive base for a Dadant 10 framed hive. All the pictures that follow will be for the same sized hive until we get to the smaller mini hives.
The "Nicot "base shown below has become a favourite to many beekeepers. It puts a of a modern slant on the beekeeps management methods. It offers some physical control over the dreaded but widespread varola mite as well as giving good ventilation to the colony. Previously most bases were constructed of wood  and more recently they had ventilation added in the form or a grillage type metal strip placed over a gap cut in the rear of the base.
The Nicot offers a very robust base that is all plastic and has the obvious added benefit of needing no maintenence. It can also be washed in bleach and very hot water. The sides of the hive constructed  of wood or platic sit exactly over the edges of the two raised groves in the base  making an exact fit.Various doors are also availible that click in to the base and finish tight against the hive.


The same base but with the side attachment fixings visible.
 When in contact with the base thise wires cross over a single screw in the base and secure the base to the hive making the hive easily mobile.
The white plastic door in this instance can be used as a mouse guard or as a closed  door for transportation .


Below is the full hive body attached to the base. You can now clearly see how the door fits snugly against the wall of the hive.


Inside the hive you can see how the base fits against the wall of the hive. I have removed several frames so you can see this. If you look just above the base you will also see the metal spacers that are fixed in to the wall of the hive but only on one side. These are very important  for two reasons. They help keep the frames apart when lifting  them in and out , helping against causing damage within the hive. The other but main reason it that if you move your hive around or it falls over, the frames with in do not rock from side to side and  in the worse case senario killing the queen!


 On top of the hive goes a frame cover or combined frame feeder/cover. The picture below shows a simple frame cover with a single hole for additional feeding. In my view this hole could actually be larger than it is. It does not allow a large amount of bees access to a feeder when the need arises and should be increased in size to at least 6cm diameter.


Below is a standard honey super of 9 frames. Yes it is  9 frames. Thats because honey comb is larger in width than brood comb  in order to give the bees sufficient space to store their( our) honey therefore replicate the natural hive. It fits over the top of the hive body. When sufficient nectar flow is availible they will start to fill the edges of the frames in the hive body. When these are full then they will  start to fill the upper spaces in the hive.  One of the best ways to deley swarming is to add honey supers. It wont stop them swarming but it can be a help. When one is nearly three quarters full you simply add another on top of the first and so on. It has been said that in exceptional years in a strong coloney you may have 4 supers on top of each hive. Each honey super if full gives you aproximately 20 pots( half kilo or 1.1 lbs per pot) of honey
Even if you have only 1 or 2 colonies of bees always try and have a spare hive or Nuc ready either at your aipiary or at hand at home to grab. There is nothing more frustrating than losing a swarm and the queen just before the main honey flow starts thus leaving you with a small hive of bees that will not have many foraging bees to gather honey. The Hive will recover but your honey harvest will be poor.
.
You will obviously move the frame cover from the top of the hive body and place it on top of the honey super,  but you will also need a queen barrier between your hive body and the honey supers. This will stop the queen laying eggs  in to the honey super.
This I will cover more in may time when I will hopefully be taking some spring honey!


The 5 framed Mini hive, Nuceus, Nuc or Ruchette

This is basically a small hive that is usually used for a small colony. There is no hard and fast rule but common sense dictates that a small swarm needs a smaller space than a larger swarm. We  aslo refer to a colony of  bees  as a Nucleus hence the shortened name of  a Nuc.  Generally when you buy a nuc of bees they come as a five framed mini hive made out of cardboard type material . This is ideal for transport but not for long term use.
The best thing about a Nuc is that it is much more portable than a ten framed hive and can be kept in the back of your car quite easily, waiting for that swarm. Its also desirable size for a swarm to build a  new home in. Studies have shown that the ideal size of cavity for a swarm to build in to is about 30 to 40 ltrs. You can also turn this nuc in to a swarm trap. I have and it worked in the first year.  I will show  you  how to make a nuc and all the parts and then how to further turn it in to a viable swarm trap in the next couple of months.


The  frame cover on the nuc is important. As well as good insulation  the 10mm ply cover is needed to help noise levels down within the hive. You also need to make a good plug for the use of a top feeder. You will need to feed your bees if they are in a nuc. You can feed a recently established swarm or a weak colony easily in a nuc


The picture shows the nuc with lid fitted. I make my nuc so that a feeder can be use while the lid is on. You need to hve a clear 10cm gap between the top lid and the lid supports on the nuc itself.


Feeder in place with lid off for demonstration.


Dimensions for the dadant hive . Ruchette dimensions will follow in a few weeks when I show how to make one up.


Cross section from above. If using ply that is 24mm you can cut to external sizes and it will still sit on a Nicot base  and do the job just as well.


Wednesday, December 21, 2011

Candy feed.

Its now the shortest day of the year. Things from now on are on the way up. Within the next 12 weeks the queen will have increased her laying to nearly full speed and subject to some mild weather in February and March,  we will  see the first noticable amounts of fresh pollen start to come in to the hive.
Initially it is mainly from the hazel Catkins, then as we move in to March you will see the wild willow (salix or pussy willow) start to flower. Following that,  many more plants become pollen bearing  and we are then in rich food gathering times for foraging bees.

Untill that lovely time, the bees have only their limited reserves to survive on. We can be positive that most colonies have gone in to this winter with well filled frames. However,  we must also bear in mind that because the weather has been so mild the queens may have actually continued laying well in to December. It  has also been suggested that some queens may keep laying during the winter months. We can only assume that the queen is able to match her egglaying levels to the amount of food coming in to the hive but ,just in case there is a short fall in stored sugar in the hive we generally like to give bees candy ( or what is also known as bakers fondant or sugar cakes)

The beauty of this food is that it is soft enough for the bees to actually eat straight away but it is also low enough in water content that it stable within the hive. It will not ferment or go off before the bees consume it or move it around the hive to a place that is more accessible for them. The other very practical thing about sugar candy is that it is very easy to give it to the bees. A slab of this candy can be either placed on top of the hive over the feeder hole, directly in a feeder tray or even over a hole in the crown board or frame cover.

The most important thing about where you put  your sugar is that it is placed in the upper or top part of the hive. Logically heat rises. This is why most overwintering bees huddle together right in the upper middle of the hive and form a ball shape covering 2,3 or 4 frames depending on the size of the colony. The honey  that the bees have naturally  stored is within these frames and throughtout the rest of the hive but many a lost colony is through starvation.

When the weather gets really cold and we have a period of sustained temperatures below freezing the bees generally go in to a semi vegitative state, in which they consume less honey. This is  good for the management of stores but  the downside is that they are unable to relocate their managed stores through  the hive to places closer to where it may be needed as they become virtually immobile. It it  not uncommon to open a hive in early spring and find the bottom of the frames full of  honey and pollen and the top of the frame full of empty cells and bees that have died with their heads in a cell, in a desperate attempt to find sufficient sugar to eat to produce heat for the colony

We give sugar in a liquid form in september immediately after the honey harvest. This gives the bees time to dry it out further and create necessary stores for winter. We give further sugar candy to hives that are smaller in size and that may be more vulnerable to starvation for the reason above and also to colonies that as beekeepers we feel they may need a little more feed availible ie not a large colony, a late swarm or an under performing colony  during the previous season.

You can make your own bee candy but it can be a little tricky when you are making up large volumes. It is availible at your local bee store. I buy my own. I find it more economical and less time consuming and  it works out actualy quite cheap per hive.


The 3 pictures below demonstrates just how quickly bees get stuck in to their sugar.
This picture was taken in early January.


 Close up of the above picture.

 This picture below  was taken the middle of march.

 Method

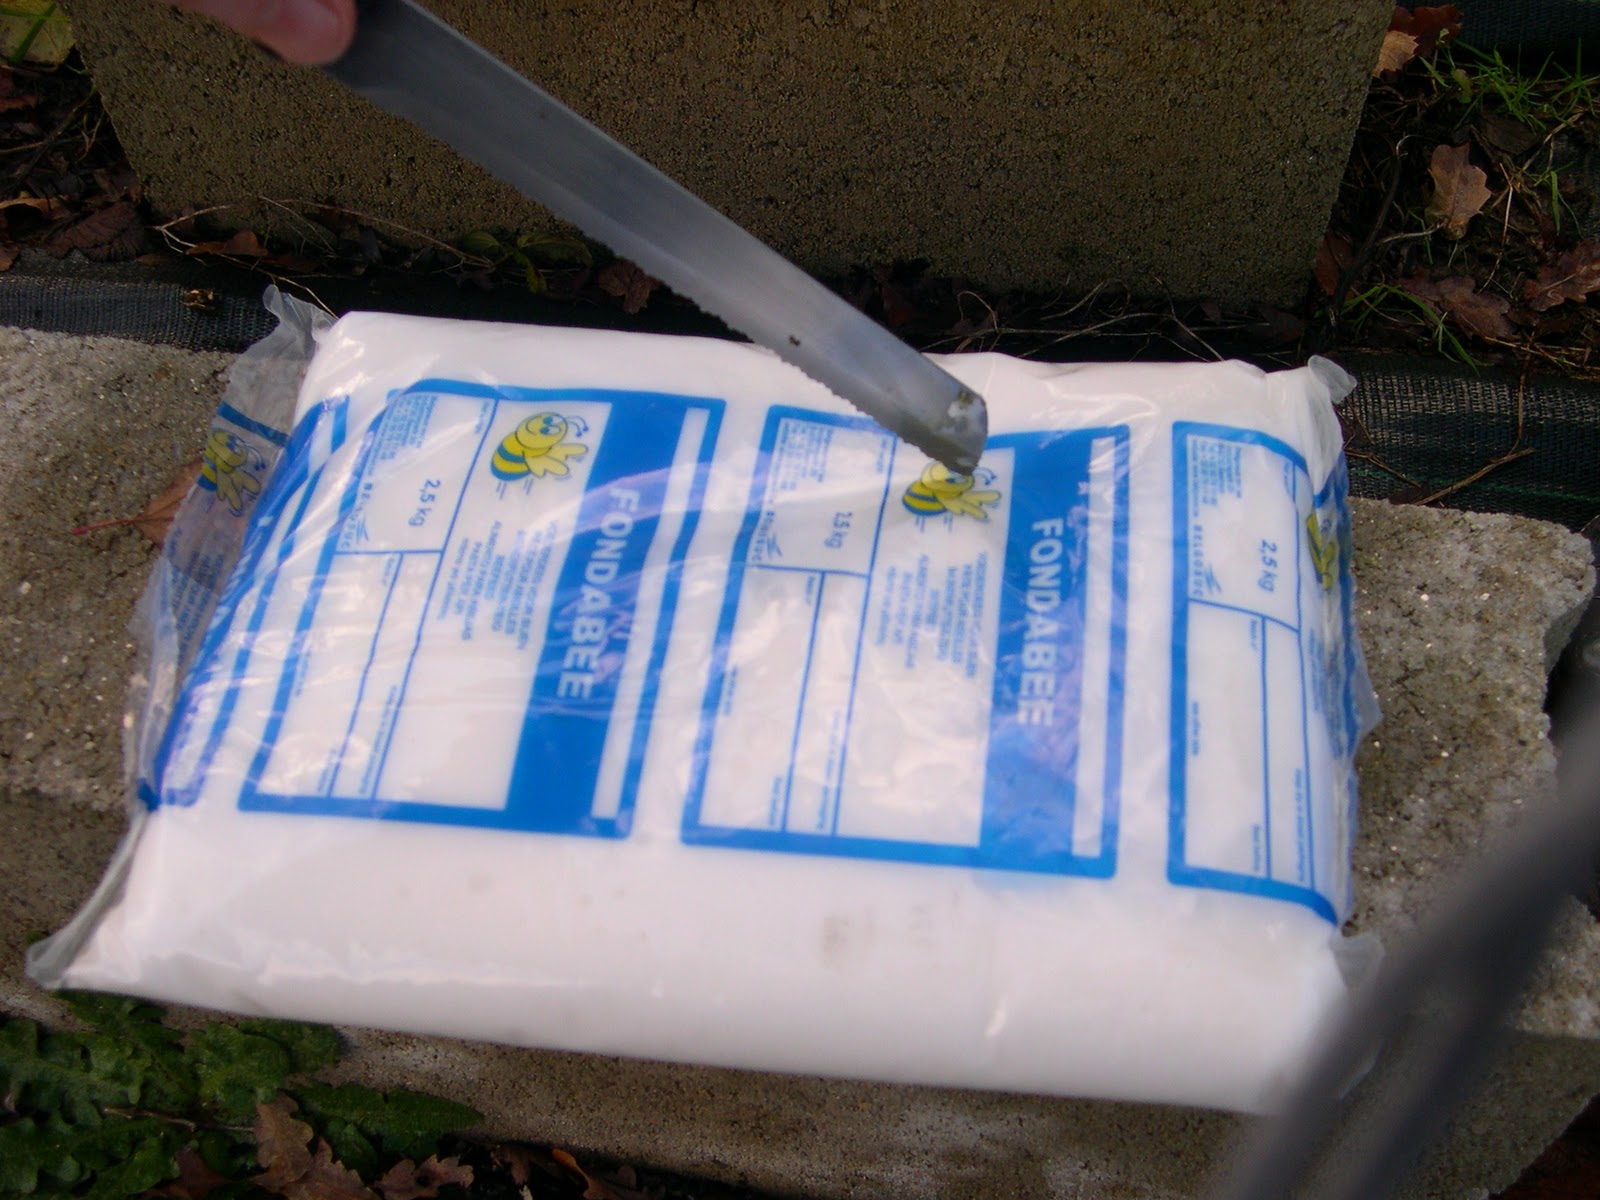
If you want to look at your bees eating their way throught their candy cut a hole in the reveres side if the bag. This means that when you apply it to the hive or nuc you will be able to see through the clear plastic top of the bag and the writing on the bag stays underbeath on the frame cover side. 

Bag with hole cut in to the top and candy exposed.


Place the sugar on top of the hive . When ready slowly remove the plug in to the top frame cover. you should find this glued down by the bees in preparation for sealing off the hive for the winter. it will come out with a frame lever.

Once you have levered out the plug flip over the sugar slab and slide it in to position so the candy is in directly over the hole. You will probably not need a suit on for this if you are quiet and quick. Dont be alarmed if you dont see bees rushing around. Its December and they are pretty quiet this time of year.

Saturday, December 3, 2011

Putting together, Wiring and fitting wax sheet to Dadant Frames.

This is a standard Dadant frame for the body of a hive obviously in kit form.
The four pieces of wood are a frame top with a grove down the middle .Two sides with pre drilled holes for the wax support wire to thread through and a recangular bottom piece that basically holds the two sides apart when fitted together.


The first thing is to take the two side pieces  and in the two flat ends hammer in 2 x 40 mm panel pins (preferably galvanised for extra longevity)
Put them in nearly all the way through but at a slight angle as below,  in order that they are easier to hammer in and cross the joint in to the top frame at a stronger angle.

Place your top frame in a vice or similar holding  device with the grove down the middle facing upwards, holding the frame side as below , Hold it to the frame top at 90 degrees and hammer the two nails in. Try using a pin hammer. If the vice holds the top frame well you will find the nails go in smoothly and  quickly.


Complete the same with the other sides , creating  the u shape as above.
Next, take the bottom bar and place it between the un- attached ends of the two sides. There will be a nail sticking out of each end. Hammer these in one at a  time, using the vice as a base as support  while you work. This will make life easier.
You now should have a fully constructed unwired frame.

Place the frame back in the vice but this time upside down.Wire up the frame going in from one side , out the other , then up or down the frame depending on how the holes are configured for the frame you have.
Some Dadant frames have different configurations of wiring. The ones I use most often are wired horizontally. Some I have used are wired vertically . Whichever frame you have always make your start knot and end knot finish on either the sidebar ( in my case thats always the case)or the bottom bar. This is  very important when  fitting the wax sheet.
Use a pair of pliers to cut the wire and a pair of long nose pliers to tighten the end wire before tying it off. It saves your fingers and makes much tighter frames.
...
Wax sheets.

I buy my wax sheets ready made. They are sold by the kilo, but basically 50 sheets weigh 5 kilos and 50 sheets covers 50 frames. If you are making half sized frames for honey supers then all you do is cut one sheet in half, so 50 sheets in this case gives you 100 frames. I will be making some honey supers at a later date this winter.
In the picture above wax sheet in just sitting on the edge of the frame. I put it like this so you can see the groove that the wax sheet sits in its really simple.
The picture below shows the wax sheet just sitting in the groove.
I have shown this in detail so you can see how it all fits together. Its not rocket science but if you have never done it before you dont want to mess up too many sheets!


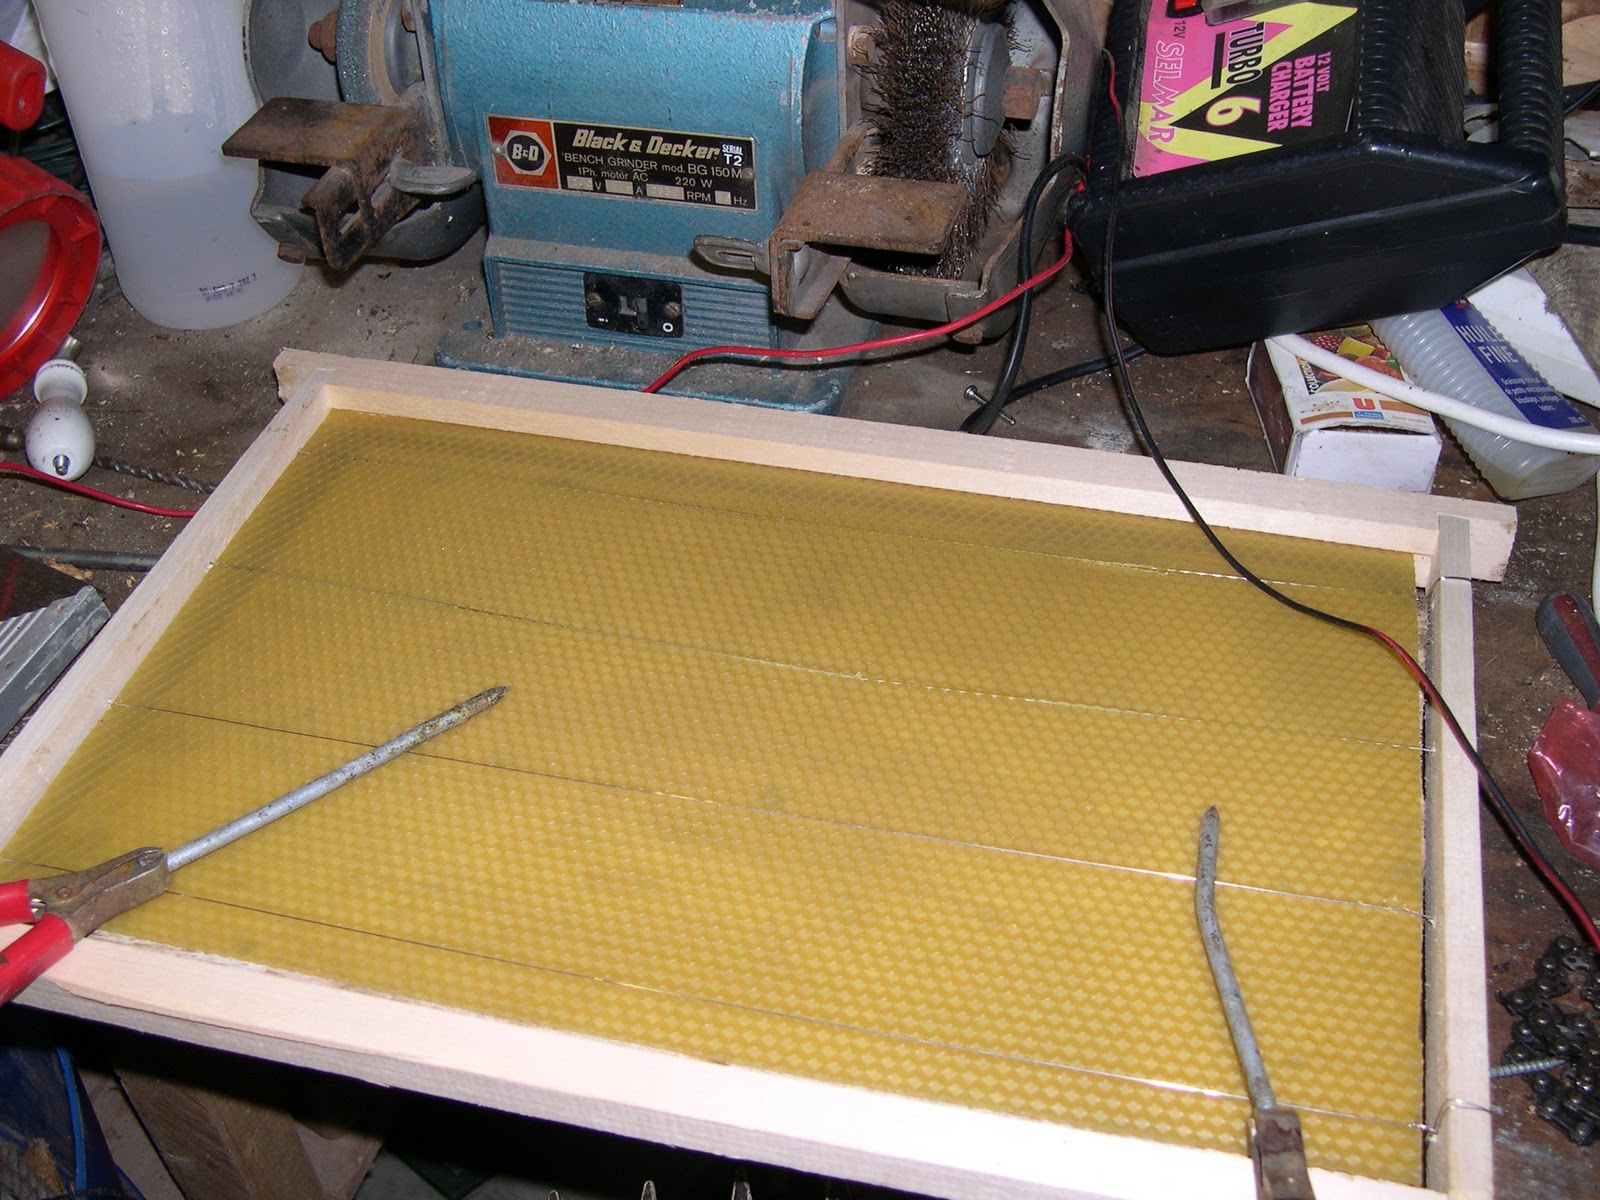
Next cut a piece of wood or ply at least 20mm thickness and just smaller than the inside of your frame by about 1cm each side. Place your wax sheet underneath your wired frame, and place the frame over the top of piece of wood . Now you are ready to melt the wires in to the wax.
Fixing in the sheet.
Its very difficult to describe this process but first you need to get hold of 12 v  battery charger. At the end of eack croccodile clip, clamp in a sharpened piece of metal. In my case I use 2 six inch nails and it works just fine.
The idea is that you put your 2 metal electrical probes on to  a piece of wire within the frame. You will need to leave at least  15 cms space between the 2 probes otherwise you find that  the wire heats up too quickly and its also likely that your wire will melt or actually stick on to the electrical probes, causing a short, the wire will get too hot and melt the sheet in half.  The best way is to touch the wire with one probe and have the other in your hand to lift away quickly when the wire becomes hot.  When you have done this  a few times you will self learn with you particular machine when to stop heating the wire.
When you have fiished the wire should generally be melted in to a position inside the sheet of wax. Sometimes it may appear more one side than the other but this dosent matter as long as the sheet is secured along each wire fairly universally throughout the frame.
The wood underneath the sheet actually will hold the sheet in place and apply a gently pressure between frame and wire while the proccess is complete. Its really simple and takes a little practice.


The wax sheet is now in position. The wires are fixed in to the wax.
Finally if you have some spare wax and a small bain-marie you can melt a small line of wax in to the jont between the frame.this will give you extra strength but Its not essential as the bees will do the same job in time.

Thursday, November 24, 2011

Preparing for next year.

November
The bees have finally been forced to retreat to their hives. The temperature has now  dropped to around a maximum of 10 or 11 degrees. Its cold, damp and not beekeeping weather.

Its now the time to start to prepare frames, hives and traps for next years season, which will hopefully start around the first week of March. All that is left to do is to give my 5 framed hives a feed of candy or bakers fondant next month. This slab of sugar should help the smaller sized colonies through the winter. I have fed all my colonies with liquid  sugar earlier in september but its far too late for the bees to be able to dry sugar syrop this time of the year. They can eat sugar candy anytime providing its warm enough for them to get to it.

Winter Jobs

All hives that are empty and have been used should be disinfected by passing a blowtorch flame over the surface of the interior. Not too much though, you dont want a charred interior and to burn off all the lovely propolis that the previous inhabitants have left. This is a great resource if a swarm becomes availible. They are much less likely to absconde if a hive has a good smell . Heating  up  the surface to just see the propolis become liquid is usually sufficient. You dont need a fancy blowtorch either. I use one that runs off replacable  gaz cylinders. Obviously, remove your base and each subsequent part of the hive. The Nicot plastic base is not very blow torch Friendly.  For this you can clean this on bleach and hot water. Also hives are very good at catching fire. Always leave your hive outside to cool off. The environment of "shed world" is such a great place for a fire to start.

Jobs to do around the Apiary

Check around all of your hives for overhanging branches than might tap against the hive. If they become laiden by snow it is surprising just how far a branch can be lowered by the weight of snow.
Here is a picture of my hives last year on 2nd december when we had 35cms of snow overnight. You can see that the shrubbery around was knocking on the hive body due to the weight of snow.


In the next post I will show you how to put dadant frames together, wire them up and fit them with their wax sheet ,ready for the season.. I buy my frames not put together (in kit form). They are cheaper like this and what else would you rather be doing over the winter months?


Sunday, October 16, 2011

End of the season

Hello and welcome to Bees in Bittany.

Over the next year I want to try and show all the things I do with my bees, from management, to building swarm traps, hives and 5 framed mini hives. How and when to carry out an artificial swarm , how and when to put on a honey super and how to extract and jar up the honey and many more small things that I could not find out when I started beekeping but just had to learn for myself. I am hoping all these small things will build into a good years blog and someone may find it really useful for their beekeeping practices.


 A standard 10 framed Dadant hive with Nicot Base and mouse guard fitted


The situation Today!
It is technically the end of the year in the beekeeping calender. The bees have been fed and treated against mites, the mouse guards are going up and the bees are stocking up their larders with the now dwindling supply of food from their last remaing source of Ivy. It has been a good start to the autumn for the bees with record temperatures giving the bees good access to Ivy as well as an unusual bonus of flowering green manures planted by the farmers at the end of their oil seed rape and wheat crops. Some rain and good temperatures have unusually brought these in to flower. These usually grow well in the autum but rarely flower due to poor autumn weather. So despite it being a very dry year with a poor summer honey crop the bees are going in to winter in good form. Good strong hives that are well stocked up.
From now on apart from a few winter flowering shrubs, the bees will have to depend on their carefully stored pollen and honey to get them through the winter.

 Typical Ivy plant in full flower attached to a ruined building.