Well just got back from a 2 week break and typically one of my hives had swarmed while i was away. Fortunately its not all bad news. I caught the swarm in one of my swarm traps. So that was the first swarm!
The second was a typical "cast swarm". much smaller in size,a few days later, and with a vigin queen!
I recorded a few seconds of film . I shook this one on to a while and very slowly they crawled in to the hive. It had been raining a little and was cold so They werent very happy, but still very well tempered.
So once i had instaled that swarm in to a Nuc, then i went on to check my other hives.
Principally i have put three honey supers on three of my stongest hives and thought that as the weather had been so poor up until now, the chances of swarming would be small but, in beekeeping , expect the unexpected! It was obvious that it was one of these three that had swarmed,
Hardly any honey in the honey super, and a lot less bees and also the swarm directly in front of suspected hive.
So then I checked my 4 hives and 3 of then had closed queencells on brood frames so i had to perform artificial swarms on these 3 , after dashing back to the house to find some spare nucs!
So, all those were artificially swarmed, but not in ideal conditions and not as many bees as i would have liked in the colony but, really not with much choice over the matter, or face losing your bees and a weak colony for a little while longer. At least if i act now then things should recover by the time of the summer honey starts to flow, well thats the theory!!!
Creating a nich in the wall of my barn for a swarm!
After I did a cut out last year at Callac in exactly the same window niche, a thought occured to me that i have exactly the same blocked up window in my old storage shed. So i have been dying to knock the rubbe out of the blocked up window and today i got on with it.
Luckily it was of very old lime mortasr so it came away pretty easily.
The finished exposed window, how it would have looked all those years ago!
the next job will be to build a frame inside the rear of the widow(inside the shed) and some how incorporate a glass viewing strip, including a door for access and then to build a front landing tray and incorporate a winter mouse guard and closing entrance door to shut them in if needed. Ie, work on the barn or oxyalic acid treatment.
So thats my plan and i hopefuly can have it completd in the next few weeks so I can get a swarm established this year. Its lot of work but i think i can get it finished in time.
I am going to fit in a timber roof with lines of wax melted in to the wood at the correct distance in the hope that the build nice vertical combs so i can see whats going on all the tme. Should be great fun if it works out.
With the help of my son Thoma,s we soon had the front carefully knocked out!
In all I have 34 traps out this year. I finished putting them all out last week. 30 of them have the feromone nasanov in and 4 of them just have lemon grass oil in. I tried to remember to take a picture of each swarm trap after it was deployed. This is a great help in remembering which hive went where.
The season is about 3 to 4 weeks late this year and to be honest the chances of trapping many swarms are not good.
Firstly the seasons of 2000 and 2001 were very dry in their summers and last year with the terrible weather we had from mid April to mid July lead to problems with requeening motherhives or requeening weak queens in general.(suprsedure). The cool temperatures, low numbers of males and just generally poor weather has lead to a decline in wild colonies by perhaps 30%.
Saying all of that ,i am still optimistic. Bees are very dynamic. and as long as i can catch a few swarms I will be delighted. If i get any where the 30 % success rate of last year then i will be very pleased!
All my traps contained at least 2 old smelly frames this year, due to last years losses, so you lose on one side but gain massively on the other and i also managd to rotate my nucs last summer and almost all my nucs, that are now swarm traps have been used at least once before. I have made another swarm trap for tree deployment, that is just pinned up. all different things to try test out different ideas.
Most traps are about waist to head height, in sheltered corner, face south west to west and are in areas where i have caught swarms before or i just cant resist the area due to its topography, position in relation to old trees and its sheltered positions.
Swarm traps are a really great way of introducing the general publec to beekeeping.
Very often i will make contact with a landowner that happends to be near to where i have been working and i ask them if they would mind if i put a swarm trap on their property or land.
Mostly the general public are quite negative about bees but the tide is turning thanks to education and the internet.
So when I arrive with one of my traps in the spring, put it up and explain to the property owner what will happen when a swarm arrives they are usually mortified or quite aprehensive as to what probems these bees might cause when they come. The truth of it is that they sometimes dont even notive a swarm ariving or it arives when they are out and all they notice is a few bees starting to come and go with pollen on their legs.
Once this has happened most people realise and enjoy the experience and sometimes peoply have asked me to leave recently arived swarms in situ, so they can watch them develop. Generally though its a good idea to remove a swarm within a week . When that queen starts to lay and the bees become a little more protective, its time to move the colony to the apiary.
Some of the typical wilow pollen that came out in early April this year three weeks alter than usual.
Queen Marking
I took the opportuity to mark a few of my queens during early April. The colonies were still on the small side and the queens are easier to find. I generally dont like to rip the colonies apart just for this purpose, but it if i see a queen, and am ready with the marking cup, she gets a yellow dot on her thorax.
As I have said before, I like to keep my qeen in the mother hive during artificial swarming. That way I feel my mother hive isnt lost for honey production afterwards and finding the queen quickly is a great help. The yellow I use dosent indicate the year of my queens , its just easier to find the queen, quickly and I have been told that yellow and white paint tends to stay on he best, so thats why i am using yellow.
This year we suddenly seem to be getting some near normal weather. The temperatures are slowly rising and for the next two weeks it looks as though we will have perfect spring weather for spring honey production, totally different to last year.
I have put on three honey supers on three on my colonies and will harvest them about a week later this year, but certainly no longer in case of crystalisaton in the frames, now that would be a shame!
Happy beekeeping . The next 4 months are the best of the year, I just love this time of year.
First inspection of my hives was carried out on Sunday 10th March. The weather was not ideal but the bees were in a very relaxed mood.
To my delight, all my hives that were queenright, had successfully made it through to what I thought was the end of the winter. Inspection of the brood sections revealed suprisingly good brood laying by all my queens, the size of capped brood reflected in the size of workers availible to support the larval stage foraging, feeding and nurserie duties. All of my colonies were fed with half a litre of sugar syrop.
Four of my colonies had brood and eggs on four sides. (of two frames), quite remarkable considering how cold the weather has been.
I am sure that egg laying frequency, like many animals nust be influenced by day length increases and not just food and temperature levels. We have had cold weather, 6 to 8 degrees colder on average than this time last year and i would have expected to see smaller colonies and smaller brood pattern, but generally its all good news.Most hives were still wel stocked too, so last autumn was a good forraging season! Also no sign of any nastiest that one would perhaps discover after a winters confinement.
So, three days later we had Snow, not just any old snow. This was a full on blizzard with temperatures below freezing for at least 3 days. I managed to get to my hives 3 days after the snow to get this pic , just for the record, but by then a lot of it had already started to melt. we had about 20 cms that drifted in the strong to gale force winds that came from the east.
A thoroughly unpleasant period of weather, but not at all unusual for March. I have memories of the daffodils in the snow as a child and there they were again, full bloom and mostly ruined by the frost!
One cant help but think that actually this is a bit of a normal season. For the last couple of years at least, I recall we have seen many shrubs comming in to flower at the end of february and I would like to think that this year we are starting to see the time scale of things begining to be "reset" to the more average time. Flowereing blackcurrant and forsythia are usualy well in flower by early march. This year its really only just begining to open its buds. Blackthorn that seemed to be coming in to flower some 2 weeks ago, has completly halted and masses of buds remain unopened.
Oil seed rape is some 2 weeks behind on last years flowering, the plants are very stunted after having a very late sowing last autumn, poor growth and germination and then sitting in waterlogged soil all winter. The flower stalks are only 30 cms high at their maximum. but putting all that aside, we still have the potential for a very good season. the ground water tables are at their maximum so lets keep our fingers crossed.
Some good pollenrich shrubs you can plant for your bees this time of year are this false quince "chaenomeles" Spp
Gorse is really good but dificult to propagate unless you have good gloves!!!
Evergreen clematis are aslo really early to flower. This is a picture from one of my clients gardens. I caught a swarm not 10 meters from this shrub last summer and it was alive with bees again, as these highly scented flowers were begining to open.
Honey bee on Clematis
Finally, all my swarm traps are ready to be deployed. I have forty "Nucs" but i am going to deploy 30 of them as swarm traps this year. I dont think i will better my percentage catch rate of last year but I will be trying my best to keep searching and improving on my bees gene pool.
They will go out in about 3 weeks, as this years weather is near normal at the moment. I am looking to deploy them all in the second week of Aprill.
Each nuc has at least 2 old frames of old comb inside. This due to my losses last summer, so hopefuly those losses will asist me this year. Its a bit of give and take in this game!
Winter flowering honesuckle cuttings, Alochol Propolis solution and sugar!
Heres a picture of my hives. Its mid winter and generally the weather has been fairly mild up until the last three weeks. Since then we have been finally been experiencing some normal temperatures.
I usually take the calm of winter to very lightly treat around my hives with a contact weedkiller, usually glyphosate. It is actually a pretty safe herbicide, if there is such a thing. It breaks down very quickly and it not volitile in cold weather, making the treatment around hives fairly safe.
I choose a very calm day when the tenperature is below 10, and try and spray late aternoon when most bees are in the hive.
The concentration is half the recomended dose. The weeds are very slow growing this time of year and they all still die off, but take a good 3 weeks before you see the signs of your treatment. If you look closely you will see the treatment starting to work. I like to treat around the hives this time of year, as there is very minimal risk to hives and the effect lasts well in to the spring, spreading some of the work of keeping the apiary weed free, to a minimum.
As usual I have fed my Nucs sugar candy and they are really removing it quickly from its top position to within the hive. This is a good sign that there is a queen at the helm, but also an indication of how mild the winter has been. Warmer weather allows the bees to move more freely within the hive and does give bees the chance to stock up on sugar and stores that may have been depleated close to the brood and few eggs that are present this time of the year. When the cold does come, if food is within a few centimeters of reach, then it increases the colonies chances of survival.
Propolis and alochol treatment on new nuc box.
I couldnt resist it and as I managed to find a few more scraps of 10mm ply i have made another swarm trap, this one to hang on a tree. I made another last year that worked the first time i used it after i treated it with liquid propolis and I needed to do the same.
So the bad news is that you cant buy virtually pure alochol from our local chemists any more in France, even in very small quantities, like 500ml. So I have been forced to try this industrial alochol, which actually has less odour (that I can smell) than the other type i used to buy. so pleasanly surprised, i have tried this one instead.
I mix up in the centre jar roughly 50/50 alochol to propolis scrapings. I find if you take the jar indoors and let it warmup in a warm room it helps all the propolis disolve. I also add a couple of marbles in to the bottom of the jar, to help agitate the mixture.
Dont forget, this stuff is a terrible stainer of hands and clothes!!! as before paint in to all the main areas. A couple of days later, give it the blowtorch treatment, just to the point of scorching over the surface of everything yo have painted. Next, leave it outside for a couple of weeks in the worst of the weather. This will help remove and heavy odours that may remain!
I rooted these cuttings late last autumn and even though theres not much leaf on top, the roots beneath the surface are going bananas|! This is a great shub for bees. Flowering in february, if the weather permits, its a great source of pollen, so plant it very near to your hives. It dosent need support, is very hardy and contains lots of pollen. You can see it on the stamens if you look carefully!
I bought one stock plant 2 years ago. It was very pot bound, which i potted up and gave a good spring feed. I managed to get 6 cuttings to root from that first attempt, which was a miracle for me!
So those plants are now big enough to be planted out this winter / Spring these cuttings above will grow really well this year and go in for next year. So it takes a little time, but within very few years
you can soon produce a lot of shrubs.
Winter Beekeeping.
Don`t forget winter beekeeping is nearly as important as summer beekeeping. Plan what you want to do, and organise accordingly. make up frames, check your old frames for signs of wax moth and treat accordingly. Start a list of possible places to put out your swarm traps in only another 10 weeks!
We are well in to february but if the weathers right it will very soon be time for the first spring inspection and feed!
The Swarm Trapping box.
The essential tool for every beekeeper. Swarm collection boxes are a little known tool, that have many advantages. Essentially they allow a beekeeper to catch a large swarm and hold it in a safe, sealed environment, that is natrually cooled, until they can be transfered later in the day to the suitable nuc or hive.
How it works
Swarming bees have natural perpensity to migrate or move towards dark holes! so basically if you put a box or tube above a swarm, theres a strong likelyhood they will move in to it!
Swarms hang on trees for the main reason to leave the hive, rest somewhere nearby in case of bad weather and send out scout bees to seek a new place to colonise. During this time we see the classic swarm hanging from a tree, on a building, washing line etc. This gives us that window of opportunity to capture the swarm either by shaking it in to a box, swarm catching box or hive. However, if its a difficult access, the this box could just get you out of trouble.
You can just place the box somewhere just above the centre of the swarm, then leave them settle for a few minutes. You can give a couple of puffs of very light smoke to the edges and this may just help edge them in to moving up.
If you have no Nuc and you simply shake your swarm on the ground then you can simply place the box over the top of the swarm and they should, after a few moments of confusion start to fan on the front landing strip to draw the others in to the box
My first swarm trapping box!
Size: 60cms x 30cms x 30cms.
Materials: (top square with handle) 16mm exterior ply. The main body 1.5 to 3 mm exterior ply. A good quality wood adhesive with grab action necessary. Corners: and edges are made from corner beading. Doors 1.5mm ply with various sized pieces of square and u shaped beading for the door runners. Mesh screening for the ventilation doors.
Cost: approximately 40euros.
Advantages:
Light weight. Gives you total flexibility. You can hold a small or large swarms. No need to put the bees straight in to a heavy cumbersom nuc of hive. You can charm the bees in to this box on a ladder, in a tree or in places where the normal nuc is just not practical.
No need to carry a nuc around . Typically you will have your used your spare nuc that moring and havent had time to get another hive from your shed!
The box itself is big enough to take all the rest of your gear including Smock, smoker, fuel , bee brush and hive tool so if have that all ready,all you need do is keep it handy, in the back of your car.
Disadvantages
This box is very difficult to construct and is very time consuming!
Once bees are in the box bees need to be transfered in to a hive within hours, as they will natrually start to draw comb inside the comb.
As with all transfer of swarms in to hives or nucs, by putting a swarm in to its non permanent position you are by choice, risking damage to the queen and or its colony, as you will subsequently have to transfer it to its final position later on. However with a little experience in handling swarms you can very easily avoid over handling and minimise the possible damage and loss to bees.
Click on the link to see the box in action
Construction.
Ok, like i said this is not an easy build. I didnt take pictures during my first go at making this box, just as well really as it was a bit of a disaster. I recomend you start with the top handle end piece of ply and using panel pins and glue, you attach one of the four sides. Then when thats dry, attach then next ajoining side, but support it as you first attach it to the handle end.
You are then left with the first long corner/ two sides pieces to join. Do this with great care, plenty of glue and i recomend you avoid using panel pins apart from on the handle end.
Use grab adhesive and let it dry. It will be super strong when dry, but let it dry completely before attempting the third and fourth side. When the fourth side is attached , this will need to be glued along the two remaining edges but take your time, its very difficult to get right before you push the two sides , glue and corner beading together, but once this dry you can then proceed to all the parts, without worry.
You will be surprised just how strong this box already is.
The rest is common sense.
There are two ventilation holes you need to make in opposite sides of the box.
Once the swarm is inside and the bottom is closed off you can open the two holes up, exposing the bees behind the mesh, fresh air will enter in to the box from the lowest hole and exit by the highest hole. The biggest problem with transporting swarms is overheating in the transport stage if no ventilation is given to the 10,000 or so bees!!
I have posted loads of pictures of the box if you wish to try and copy it.
If you have any further questions then the please dont hesitate to contact me. It really is a tricky one to make. not quite as bad as a bee lining box, but not far off!
Base showing door section runners on 3 sides.
Bottom door in place. Note, when front tray is in contact with the third and rear runner, the front door is still ajar by about 1.5 cms. This created the perfect access for the bees, a nice small landing area with good access i and out of the front and none anywhere else.
Internal View of the box. you can clearly see the off-set ventilation doors
The front totally closed . I have a simply pin that joins the two front wooden blocks, thus closing and locking the front of the box.
Side ventilation removed
Reverse view of lower door.
So if you manage to get all the above right and believe me its a challenge, you are ready to put it to use.
I have also posted some pics of swarms I have caught and also my beekeeping teacher has allowed me to publish for the purposes of demonstrating this box.
Swarm on top of a bee trap
This happend last summer. A swarm arrived at my trap, obviously the queen didnt want or like the look of what her scout bees guided to, so they all settled on top of the box.
I returned a day later after discussing this problem with my mentor and he suggested brushing the bees in to the box if they were still on the box after a day. This i tried and they all took to the air to my disbelief! They circled the garden and then fortunately landed on a shrub in the garden in and ideal swarm shape.
I then shook them in to the box, put the lid on but not closed, turned it over slowly over about 20 seconds and placed it on the ground. Immediately the bees started fanning, indicating the queen was in the box and that they were all happy with the new environment.
Back at the apiary I gave this queen and colony the white sheet method, I gave them a different nuc, that would have had a different smell, knocked the bees out of the box and just let them walk in to their new home which worked well, without the swarm catching box i would have struggled to secure the swarm.
Swarm lands on raspberry branches.
This time the branches, nearly on the floor were bent down between two bricks for extra gap between the grass and the box and the bees simply went up in to the box.
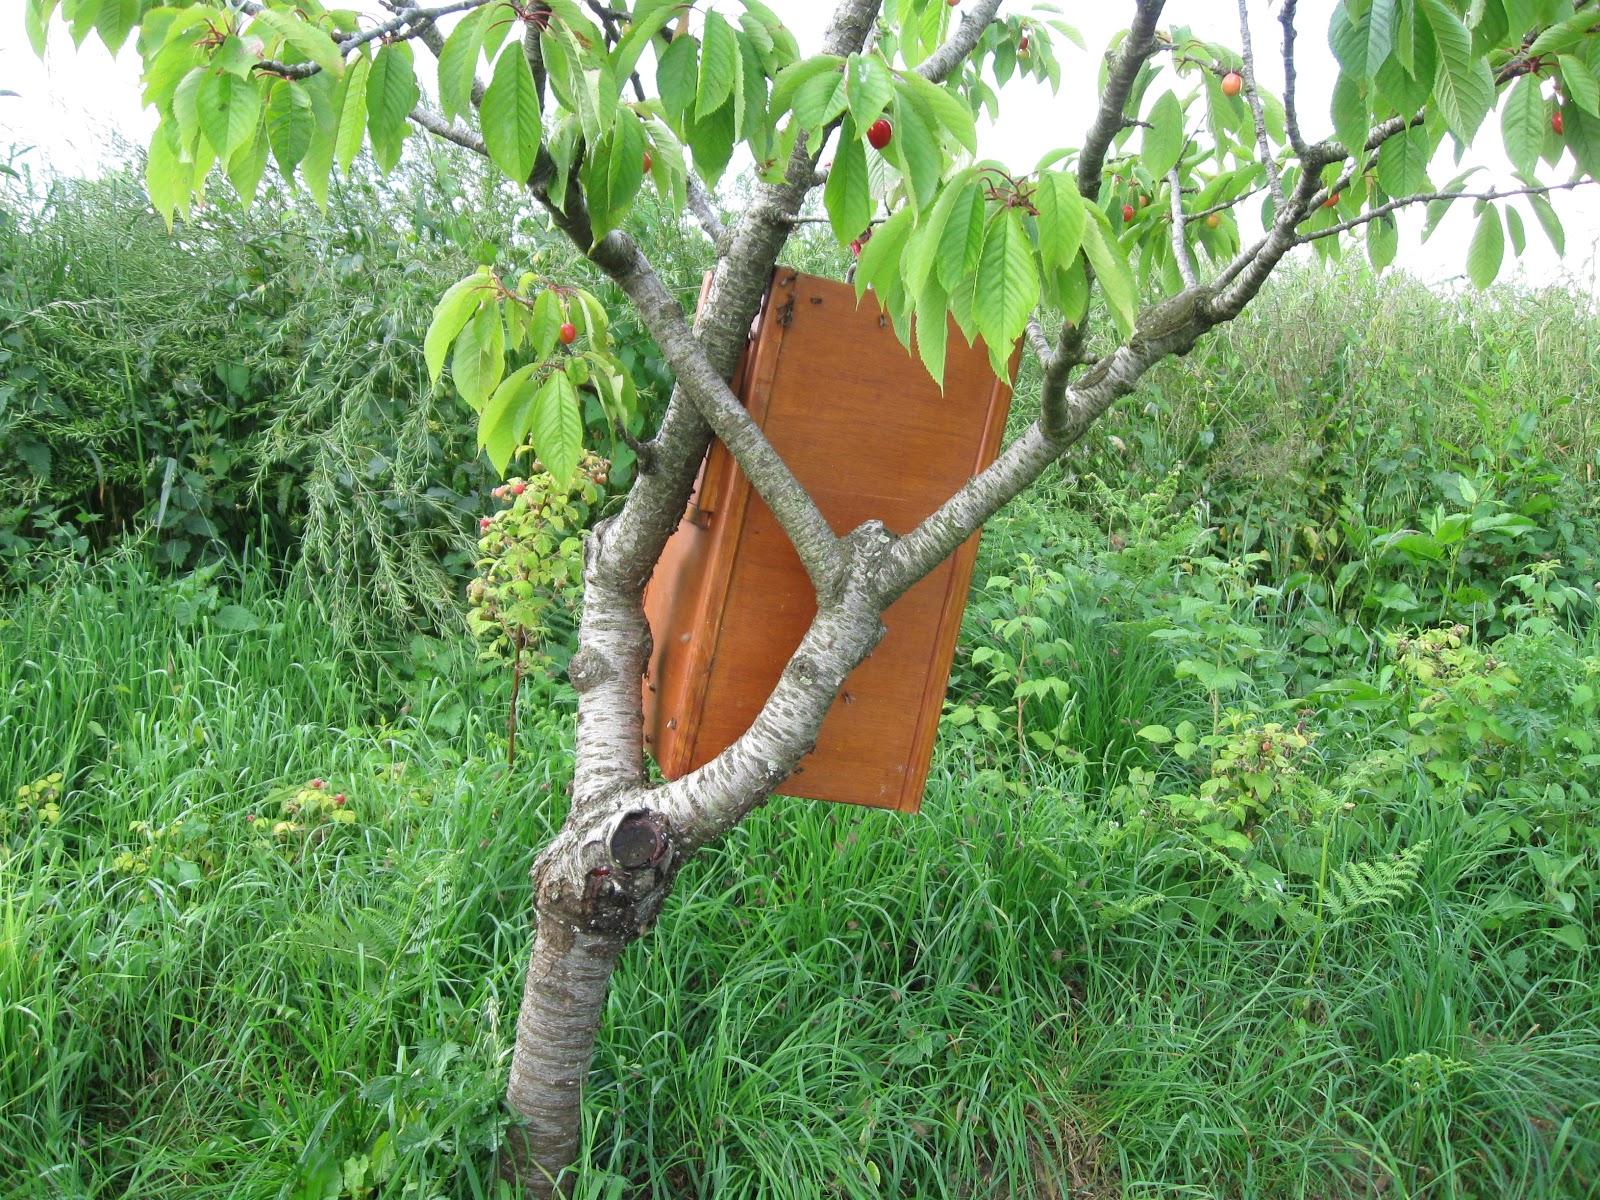
Swarm found around the base of cherry tree
This next sequence of photos shows the swarm before , the positioning of the box and the subsequent transfer of the bees in to the box.
The box in hung with the opening, just about one third from the top of the swarm.
All Bees inside, time to close off the bottom door and open up the side vents.
Closing off the bottom tray is a dilema, but normally you will loose no more than 10 or 20 bees. If you are not sure when to close of the door, then wait a little longer until more are in, but beware! they may change their minds and abscond at any time,leave the box and settle elsewhere, so be warned! Generally though they seem to want to settle for a while, making this easy.
Best of luck! Many thanks to my beekeeping teacher, Mr Charles Basset, for allowing me to use some of his pictures and video!
Pictures here Charles captures a swarm on a washing line. Beautiful swarm!!!!
Swarm Trap report 2012 season
Good swarms were issued in this year and of a fair size, considering the poor foraging conditions and general bad weather.
Swarms were issued in general, in typical style, with bad weather for the previous few days and then swarms issuing in the following brief period of better weather.
Very good sized swarm! They don`t come much better than this!
In all I set 23 traps and caught 7 swarms. Thats not a very high percentage , but if you were to offset the cost of the swarms you had caught, against your materials for the season, then you could say they more than paid for your expenses.
I tried new places to set my traps as well as placing some traps in places I had caught swarms before. In all I was very pleased with the success rate, a swarm of bees is more valuable to me than the money it may generate from its sale.
Swarm Size
The size of swarms this year has been generally good. It is a matter of debate over the conditions that give rise to larger than average swarms over a particular season.
For me it is a combination of things. Obviously the avalibility of food is one thing but i have a theory that if there`s plenty of of food avalible, yet the number of bees out foraging hard is not large and the food brought back to the hive is done so without larger than average mortality to the hive, then this would help in above average swarm size, Another thing to mention is that we actually had good weather between March to the middle of April which would also give a good start to the spring build up. Pollen, coming early in abundance, stimulating the queen in to spring laying mode, higher than average laying patterns, which may also give rise to above average size swarms casting in May and June, providing that that incoming food stayed the same levels.
Weather problems and disaserous reqeening
Assuming that generally most swarms issue due to the fact that the hive is over populated and the queen is more than likely to be in her second or third year, most swarms inevitably requeen after establishing a new colony.
This year has been a disasterous year for re queening.
Essentially, as I have previously said, many hives swarmed at my apiary, due to the good size of the colonies and the feeding and treatment i have given them over the early spring. However the weather was so atrocious from mid April onwards, that the re queening in most cases failed. Swarms from my hives and my swarm traps were parallel in the re queening problems.
from mid may onwards the weather had been so poor, that emerging Virgin queens would have struggled to find enough good days to complete their mating flights, as well as enough males to mate with successfuly in the small window they have to complete their nuptules.
Many times this year, I have opened a hive to see if a new queen had started to lay only to find a colony of disorganized bees running around the frames noisily, with no eggs , or brood. I also often found a virgin queen from time to time, and in a couple of hives saw the same virgin queen, over a three week period.
Obviously completly unable to mate due to the diabolical weather that plagued us until mid july. MOstly the hives became drone layers with in a couple of weeks more and the hive was lost.
Due to this requeening problem, my beekeeping teacher thinks that in this summer as much as 30% of wild bee colonies could have died out altogether. This is obviously very bad news for our wild or feral colonies here.
Next Year
Well I have already a good idea of where most of my 30 swarm traps are going to go next year.
In fact I wish I had more nucs that were old and smelly enough to use, but i only have 38 in total and need to leave some availible for other jobs, such as artificial swarming in the spring.
Use your winters wisely, make up Nucs, prepare your material for next year, make up frames and disinfect your old hives with a bow torch.
Take a drive out to see possibe swarm trapping sites. It may take more than one tip to a homeowner to convince them that putting a swarm trap in their garden is a cool thing but recently i have found that most people are really excited about the idea.!!
On the positive side, I lost about 7 swarms or colonies this year so i have plenty of draw up frames for my swarm traps next year. so its not all bad news!!
I will post pictures of my swarm traping box in the next post, with detailed pictures for its manufacture.
Its a really simply but cool piece of kit if you don`t have a nuc box spare. Worth the time it to build
Bees using this cool swarm traping box for their new home!
Hi, Well I have completed my honey harvest in the first week of September and sorry for not posting sooner but I have been just so busy of an evening.
The harvest was very small but it is of excellent quality.
I harvested 6 honey supers, but none of them were full and ended up with 33 pots of honey.Thats just over 16 kilos.
It may sound a lot but after you have given a pot of honey to everyone who called you to collect a swarm in their garden, or friends who had swarm traps in their gardens, you don`t have a lot left, but the quality of the honey this year is extremely good. I dont have a moisture meter but I think it is borderline on the high water content and it is very runny, but it tastes soooo good!
I have some pictures of the extraction method.
Decapping: This is the slicing off of the top wax cap of the honey comb to reveal the honey beneath.
Please excuse this old picture, during my first honey harvest.
The wax capings then are left to be washed at a later date, with the water from the washings fed back to the bees. The wax of course is of excellent quality and reasonably pure and needless to say has endless uses.
Next the frames are loaded in to the extractor. Depending on the size of your extractor, then the more frames you can spin at once.
This is an electric radial spinner, so the frames don`t need to be moved around and spun each side, they are still spun in both directions.
Short Video of the machine in operation.
Hey presto, Honey comes out of the bottom. It goes directly through 2 grades of sieves and in to a bucket for collection. From there it goes in to a maturator or settling tank, where all the tiny bubbles come to the surface over a few days and then its finally ready for jarring or bottling up.
This years honey should stay as a liquid for a long time before it finally starts to crystalize towards next spring.
The late summer dearth has arrived.
The summer dearth has arrived, with only a very few flowers around. We have had a few, very dry weeks since it stopped raining in mid july and subsequently the gound is like concrete.
Fortunately, the phacelia I sowed at the end of the rains, came up quickly and is now in full flower.
My bees love it and its a joy to watch this blue swath alive with bees of all kinds, not just honey bees.
The ivy should start to flower in earnest around the end of next week so my bees will have had a good food source, just when they needed it. After the ivy has finished the bees start to rely on the reserves they have got stored away, because theres not a lot around until the hazel and willow start flowering in february. Autumn is starting to draw its golden blanket and things are starting to loose their summer colours,
Bees On Phacelia
Tomorrow I am off to try some Bee lining , and ancient method of finding wild bee nests. I only want to find them so I can place my traps at the right distance from them next year, in the hope of optimising my swarm catching chances.
.JPG)


.JPG)
.JPG)


.JPG)
.JPG)


.JPG)
.JPG)


.JPG)


.JPG)
.JPG)


.JPG)

.JPG)
.JPG)