Pages

Monday, February 27, 2012

How to Build a Dadant Five frame Nucleus Hive or Ruchette.

The Parts.

I have taken a picture of all the parts that I use to construct this 5 frame Dadant Nuc hive, The parts are all easy to get hold of but more difficult if you wish for example to use scrap ply wood.
I go to my local dump when I am dumping green waste, which for me is usually two or three times a week, so for me I am lucky. If you dont have a resourse of recycled tymber or ply you will just have to buy some but its still usually cheaper to make 1 or 2 nucs than buy them off the shelf but worth checking out and comparing the costs. You may find if you make as many as you can get out of a sheet of ply, you get better value for money.
The best thing about making your own it that you generally get a better product at the end that will last you a lifetime if you make it correctly.The "off the shelf " ones are not a patch on the ones you will make yourself.


See the video here part one (added Jan 2014)


Part two.


Parts needed for nuc box construction


I use 16mm ply for the for the main box construction. The ply should be  "WPBP"  grade, which stands for weather proof, boil proof. This should ensure that the box will not warp or split if it gets wet. You can use ply that is also graded as "MR "which meanse moisture resist but you will need to treat the nuc with PVA sealer or similar, to give it more durability.
It is aslo important to say at this stage that you should never treat the inside of your nucs and hives with any kind of timber preservative. All the treatement you need can be applied to the exterior of the box when you have finished the construction this will therefore have no impact on what goes on in the hive.


List of parts and dimensions for construction.

Enough 16mm ply to cut to the following sizes (all sizes in cms)

2 x 48 x 32.5 ( for the two sides)
2 x 30 x 20 ( for the two ends)
2 x 23 x 10 ( for the two handles each end)
1 x 23 x 51.5 ( for the base)

1 x 23 cm x 16mmx16mm  quadrant For the front lip on the wooden base
1 x front door in metal 23 x 3.5
2  small eyelets to secure the front door
6 eyelets and penny washers to secure the base to the main hive body.
Enough wood to make a lip around he top of the nuc to suport the lid.
10 to 16 mm ply to make the lid for the box and enouch 10 mm ply to cover this afterwards.
1 sheet of thin alluminium for covering the lid of the box.
4mm x 35mm Screws for the main construction.


How to

Cut the six main pieces that make up the hive body.  Tip:If you dont have a workshop and are cutting on a makeshift bench by hand, take care to at least get each pair exactly the same size. This makes the fitting together so much easier.


With glue and screws join the two end pieces to one of the sides ( as per the photo and when this is done, flip it over and then complete the basic shape by adding the other side. Its a little tricky to get the first end and sidepieces to hold while you drill and screw. Once you have got the first screw in you, will find that this will hold the rest together as you complete the basic shape. Make sure the two ends are fitted to either the upper or lower section of one of the sides, not one upp and one lower!! i have done this a few times doh!!! (as per the picture below!)


Next fit the two handle end pieces to the upper end of each side.


And yes, when you fix on the handle that leaves the correct gap for the frames to go when dropped in to the hive body afterwards. Its that easy!!

Wipe any glue away as you complete the initial construction. You should now have the basic shape completed .
Next, decide which end you wish to have  the door ( you may have used some ply thats not the best finish on it so choose the best looking end!)
Draw  line 2 cm in height  across the base of where the door will be . Then simply with a jig saw cut out the "u "shaped piece of wood starting and finishing from aproximately 1 cm in from each end. Dont forget that each end where you start and finish cutting there may be some screws holding the box together, screwed in from each side. Jigsaw blades dont like these!!


 Nuc with entrance cut out


Next turn the whole nuc upside down and fit the base section. This should overhang the entrance door you have just cut  and finish flush with the rear of the nuc. I like to fix the base down with eyed fixings. ( the same type you would put in your garden wall to tie in your garden plants). This enables you to unscrew your base if you need to clean it in the field. It makes the job so much easier. I also use penny washers between the base and the bottom of the eye hook as it gives you a really tight finish.
Tip: Pre drill the holes first or the ply could split!


Next fit the small quadrant piece to the front of the Nuc entrance. Dont worry if you have the wrong size quadrant. Its the finish on the top that is important. This picture taken from underneath shows a difference in height between the base and the quadrant but its not a problem and you wont see it when you turn the Nuc over.
As previously when fitting the quadrant pre drill the holes with a 1 or 2 mm drill bit and use glue and panel pins to fix in position.


 Quadrant fitted to base. Leave dry before you trim off the ends !


Next flip the box back over and fit the two pieces of scrap wood to the base as in the picture below.
Do not worry about this wood being good quality. These feet are  really "sacrificial" and will support the nuc well. This shape also fits well in to different roof structures if you are using the nuc as a swarm trap.


Tip:  Don`t extend the feet too far towards the front of the nuc. Ensure they finish about 10cm back from the edge of the landing strip. When you are doing a transfer to a hive or another nuc, this lip will enable you to rest the nuc on the entrance of the new hive and allow the remaining bees to walk in to their new home, making it seamless and smooth!


Next, fit  a band of wood around the top of the hive . I use 18 x 21 mm strip pine or similar but its not too important as  long as the size will match up with the size of the lid you are making later. The key thing  is to ensure you create a rim of about 1cm depth minimum. This will give the lid a good base to sit on and not blow off with the first gale that passes!


Ok, so the basic construction is now complete. Its a good time to give everything a good rub down with sand paper, about 80 grit and again with about 120 grit , but dont go mad its not a chippendale finish you are after.


Next fit the two metal bands that support the frames.Tip: you may not need these spacer bands if you are making a nuc for american or british use ie langsdroth and british national hives have their own supports on the frames. Have a empty dadant frame handy when fitting and just ensure that when you finally nail the supports in place there is a good 8mm gap between the top of your frame and the eventual position of the lid of the nuc. This will allow your bees to move around the hive and crawl over the top of the frames . I use cut  14 mm cut brads as panel pins are too small for the holes already cut in to the metal supports.


Next with a empty, unwired,  un waxed frame placed in to position in the hive, draw a line either side to mark the natural position of each frame in the hive.Tip:  press this down firmly to ensure it well in to position!!
When you have done this for all five frame positions the using a small set square placed in the hive draw a paralell line through all these marks at about 10 cms up from the base of the inside of the hive. This will give you the correct position to hammer in your "U" shaped wire fixings that when in position will stop the frames in the hive moving from side to side if the hive is knocked or moved by accident. The result of this movement of these supports will cause bees to get squashed, set of a chain reaction of distress feromones released within the hive but also in the worse case senario kill or damage the Queen.


Frame wire supports in position


Next cut out from some clean scrap ply the top frame cover for the nuc box. Ideally you should make the length and bredth of this about 1 or 2 mm smaller than the top of the nuc. This helps when taking the lid on and off and also helps againts knockng the lid when removing it and disturbing the bees. Some recent research suggests that the thickness of frame cover for all bees is important. Certainly for heat loss reduction in the winter months but also for noise reduction within the hive. Try and use at least 10 mm ply.
Draw a line from corner to corner on one side. This will mark the centre of the lid.
Then with a hole cutter, cut out a centre hole with diameter about 6 to 8 cm . This will be your feeder hole. It needs to be this size to allow a steady passage of bees to and from a feeder. Any smaller and a queue can form and this is just wasted time for the bees.


Sand the inside of the hole on the frame cover on both sides, then also sand the small disc that came out of your hole cutter when you made your hole in the frame cover.
Find another scrap of ply left over from cutting the lid approx 10 x 10 cms is ideal. Then glue and pin the disc of wood from the hole cutter to this.
You have now created  your lid and feeder hole!


Feeder hole with  plug in situ on top of the frame cover.


Painting

Now its time to give all the hive a good paint. I like to use a water based exterior wood stain. It is harmless to bees when dry, water washable and really easy to apply. You can just wrap the used brush in a plastic bag between coats and that stops it drying out. I find that usually 2 coats is sufficient. Be a bit liberal when painting the landing strip in front of the doorway. This is really the only piece that may have a small amount of water on it from time to time. I like to paint the top lip of all my ply edges but that still doesn't allow any paint to be on the inside of the hive when its being used by the bees. Dont forget to paint the undereath. It really will help everything last for a lot longer.
When the paint is dry you can fit the door and put any numbers on you may need. Its always a good idea to mark any Nucs up with either simple numbers or letters. You may think you will remember which one is which but you wont when really need to!
I get my numbers and letters from my local car garage. They are a by product of  number plate production.
They are metal, very long lasting, reflective and  perfect produce again for free!


Making the lid.

If I am making more than 1 or 2 lids I like to cut off a load of strips with my skill saw. It makes making the lids less of a labour, especially when you have got this far. The lid depth should be at least 10 cm. This means that when it sits on the top of the hive you have aproximately 8 cms plus of space between the frame cover and the inside of the lid roof.  This is purley so that you are able to feed your bees and leave the lid in situ. You may want to make some very shallow lids so the hive isnt so tall when transporting or using as a swarm trap but its really your own preferance.
I fix my lids together with screws at each end. Construct the lid frame on a flat work surface ensuring that as the lid is constructed, you have one side of the lid perfectly evenly joined. This is the side that will  be closing to the hive. The other side is to be covered in ply and doesnt have to be oh so perfect. I dont even bother glueing my lids together. Dont forget that when you cover the lid frame with ply you are giving a lot of extra strength to the whole thing. Use any old scraps of ply, it really does not matter what you use. Even  orange painted old cupboard doors. any scrap, just try to give it a bit of thickness sround the 10mm size.


When you have covered the lid in ply, you are ready to paint up the lid. Be sure you paint up all the joins and cuts in the ply well. These are the places where water will ingress during the long winter months. Remember the lid will not come in to contactwith the bees so paint it well, also remembering that about a third from the top lid down will not actually need painting because you are going to cover that part with your water proofing material.
I like to use a thin alluminium sheet, that is a by product from the printing industry. The trouble is sourcing the sheets. I got a load from my local printers but glad i did because the machine has  now been scrapped. However I have seen the same sheets for sale at bee keeping shops. You can use roofing felt but this can heat the hive too much in the summer months. The thing with metal sheets is that they are light, quick to fit, reflect the sun and also dont break down. They will last the lifetime of the hive. You may pay slightly more for them but they are by far the best product. If you have access to and are a good fiber glass resin user then I think that that would also be a good choice of material but I| think also the the resin would give of an odour for the first couple of year so thats something to consider.

Fit the metal sheet by cutting it to shape first with a stanley knife and a good straight edge.
 You only have to score to sheet to cut it , then bend it back and forth and it easily breaks along the desired lines. Centralise the sheet and then bend it in to place over the edge of a work bench. I also find a rubber hammer is a good tool as well. Cut and fold the ends as though you were wrapping a present. You are not going to get perfect joints the first time you do this as it does take a little practice. Watch your finger, its all sharp and the classic DIY accident waiting to happen!!!
I use 10 mm staples to secure the roof to the lid. The staples may not go all the way home when fixing but you can give them a little tap with a hammer to tidy them up. you can also use small galvanised felt roofing nails.


The Completed Nuc


I will be explaining how to change one of these in a viable swarm trap in my next blog. Its very simply but again the attention is in the detail! Wild swarms are few and far between but you will stand a good chance of catching one if you follow a few simple steps. You can also use a swarm trap in the close vicinity of your own apiary. This will help protect you against losing a swarm. I hopefully will be posting that in a couple if weeks. Good luck in you Nuc Construction.


Monday, February 20, 2012

Spring is nearly here

Spring is nearly here. We have lost the bitter cold in Brittany and most of france that has been around for the best part of the last 2 weeks. The wild Salix is starting to come into bud and some bees are beginning to come and go from the hive in the middle of the day at the peak of  day time temperature. The visits outside the hive this time of the year are more for the bees to relieve themselves of the waste products within the hive.
If we get a period where the temperature  rises to more than 14 degrees you will very quickly see a large amount of bees buzing around the hive.
They will be primarily cleaning themselves but if you watch you will soon see some  bees  emerging from the hive carring underneath them, bees that are dead , dying or otherwise designated no use to the hive and therefore to be disposed of !
One of the other main jobs within the hive is also to immediately re stock the hive with pollen from outside ( if availible) and sugars ( honey ) from else where in the hive. The main problem with bees in the winter is that they may have sufficient food within the hive but they sometimes just cant reach it if the temp is just too cold.
Bees become progressivly lethargic as the temprature falls. If you have fed candy during december and you are able to see the bees you will notice how quickly this is removed from its packaging and taken in the hive.
You will also notice more pollen coming back in to the hive.
There are a few mature gardens near my bees that have large early flowering camelia bushes in. Most Camelias are a really good source of pollen and you can watch the bees on the shrubs and  also returning back to the hive with this bounty carefully loaded to their legs.

Hopefully with in the next 2 or 3 week I will be giving my hives their first inspection. I will be watching the temperature carefully that it about 14 degrees or above and I will  also be going to treat the hive against varola mite which will have weakened the hive over the las 5 months since my last inspection.
I will also be cheching for any diseases such as American Foul Brood (AFP) and European Foul Brood which can take hold ( more so over the winter months) and devastate the hive  well as possibly infecting the hives of my neighbours.
If you find or suspect foul brood within your hive then you must inform you local "Defra" In UK or for me in France the" Department Service Vetrinaire".
You cannot treat this disease but you can move the hive off its stand, place a clean hive in its place, fitted with brand new frames and undrawn comb. Brush all your bees off each old frame one frame at a time in to the new hive untill the vast majority of bees have been brushed in to the new hive. Put the old frames in to a sealed bag and destroy them by burning.
Try to find the queen during the transfer, as there will be no eggs on the new frames for the bees to make a new queen . If the queen is missing or she is damaged during the transfer then the colony is lost. Feed your newly hived colony with pure liquid sugar. They will very quickly recover as if they are please you have given them a new clean home.
They will draw up their new way frames with amazing speed as though you have just hived a spring swarm.

Also during the inspection I will be feeding the bees with half a litre of sugar syrop per hive.(for the next 3 weeks) This is a great way of stimulating the queen in to increasing her egg laying and hopefully getting the colony away quickly  for an improved spring build up.

I will let you all know how I get on. In the mean time I will be finishing the "how to make a Nuc" but its taking a little longer that I thought.

Friday, January 6, 2012

Hives, Honey Supers, Mini Hives and Nucs.

Taking a look at the parts that make up a hive


I have taken a series of photos in order that if not already, you become familiar with the components that we use in beekeeping. It is important you know the basics before you start your beekeeping practices.
Good knowledge of the individual parts will enable you to  carry out the best management  and manpulations for your hives, in turn giving them the best conditions to proliferate. Get it wrong and you can "stall" your bees and effectively put on the handbrake on the hives development.

Hive base

The picture below is a hive base for a Dadant 10 framed hive. All the pictures that follow will be for the same sized hive until we get to the smaller mini hives.
The "Nicot "base shown below has become a favourite to many beekeepers. It puts a of a modern slant on the beekeeps management methods. It offers some physical control over the dreaded but widespread varola mite as well as giving good ventilation to the colony. Previously most bases were constructed of wood  and more recently they had ventilation added in the form or a grillage type metal strip placed over a gap cut in the rear of the base.
The Nicot offers a very robust base that is all plastic and has the obvious added benefit of needing no maintenence. It can also be washed in bleach and very hot water. The sides of the hive constructed  of wood or platic sit exactly over the edges of the two raised groves in the base  making an exact fit.Various doors are also availible that click in to the base and finish tight against the hive.


The same base but with the side attachment fixings visible.
 When in contact with the base thise wires cross over a single screw in the base and secure the base to the hive making the hive easily mobile.
The white plastic door in this instance can be used as a mouse guard or as a closed  door for transportation .


Below is the full hive body attached to the base. You can now clearly see how the door fits snugly against the wall of the hive.


Inside the hive you can see how the base fits against the wall of the hive. I have removed several frames so you can see this. If you look just above the base you will also see the metal spacers that are fixed in to the wall of the hive but only on one side. These are very important  for two reasons. They help keep the frames apart when lifting  them in and out , helping against causing damage within the hive. The other but main reason it that if you move your hive around or it falls over, the frames with in do not rock from side to side and  in the worse case senario killing the queen!


 On top of the hive goes a frame cover or combined frame feeder/cover. The picture below shows a simple frame cover with a single hole for additional feeding. In my view this hole could actually be larger than it is. It does not allow a large amount of bees access to a feeder when the need arises and should be increased in size to at least 6cm diameter.


Below is a standard honey super of 9 frames. Yes it is  9 frames. Thats because honey comb is larger in width than brood comb  in order to give the bees sufficient space to store their( our) honey therefore replicate the natural hive. It fits over the top of the hive body. When sufficient nectar flow is availible they will start to fill the edges of the frames in the hive body. When these are full then they will  start to fill the upper spaces in the hive.  One of the best ways to deley swarming is to add honey supers. It wont stop them swarming but it can be a help. When one is nearly three quarters full you simply add another on top of the first and so on. It has been said that in exceptional years in a strong coloney you may have 4 supers on top of each hive. Each honey super if full gives you aproximately 20 pots( half kilo or 1.1 lbs per pot) of honey
Even if you have only 1 or 2 colonies of bees always try and have a spare hive or Nuc ready either at your aipiary or at hand at home to grab. There is nothing more frustrating than losing a swarm and the queen just before the main honey flow starts thus leaving you with a small hive of bees that will not have many foraging bees to gather honey. The Hive will recover but your honey harvest will be poor.
.
You will obviously move the frame cover from the top of the hive body and place it on top of the honey super,  but you will also need a queen barrier between your hive body and the honey supers. This will stop the queen laying eggs  in to the honey super.
This I will cover more in may time when I will hopefully be taking some spring honey!


The 5 framed Mini hive, Nuceus, Nuc or Ruchette

This is basically a small hive that is usually used for a small colony. There is no hard and fast rule but common sense dictates that a small swarm needs a smaller space than a larger swarm. We  aslo refer to a colony of  bees  as a Nucleus hence the shortened name of  a Nuc.  Generally when you buy a nuc of bees they come as a five framed mini hive made out of cardboard type material . This is ideal for transport but not for long term use.
The best thing about a Nuc is that it is much more portable than a ten framed hive and can be kept in the back of your car quite easily, waiting for that swarm. Its also desirable size for a swarm to build a  new home in. Studies have shown that the ideal size of cavity for a swarm to build in to is about 30 to 40 ltrs. You can also turn this nuc in to a swarm trap. I have and it worked in the first year.  I will show  you  how to make a nuc and all the parts and then how to further turn it in to a viable swarm trap in the next couple of months.


The  frame cover on the nuc is important. As well as good insulation  the 10mm ply cover is needed to help noise levels down within the hive. You also need to make a good plug for the use of a top feeder. You will need to feed your bees if they are in a nuc. You can feed a recently established swarm or a weak colony easily in a nuc


The picture shows the nuc with lid fitted. I make my nuc so that a feeder can be use while the lid is on. You need to hve a clear 10cm gap between the top lid and the lid supports on the nuc itself.


Feeder in place with lid off for demonstration.


Dimensions for the dadant hive . Ruchette dimensions will follow in a few weeks when I show how to make one up.


Cross section from above. If using ply that is 24mm you can cut to external sizes and it will still sit on a Nicot base  and do the job just as well.


Wednesday, December 21, 2011

Candy feed.

Its now the shortest day of the year. Things from now on are on the way up. Within the next 12 weeks the queen will have increased her laying to nearly full speed and subject to some mild weather in February and March,  we will  see the first noticable amounts of fresh pollen start to come in to the hive.
Initially it is mainly from the hazel Catkins, then as we move in to March you will see the wild willow (salix or pussy willow) start to flower. Following that,  many more plants become pollen bearing  and we are then in rich food gathering times for foraging bees.

Untill that lovely time, the bees have only their limited reserves to survive on. We can be positive that most colonies have gone in to this winter with well filled frames. However,  we must also bear in mind that because the weather has been so mild the queens may have actually continued laying well in to December. It  has also been suggested that some queens may keep laying during the winter months. We can only assume that the queen is able to match her egglaying levels to the amount of food coming in to the hive but ,just in case there is a short fall in stored sugar in the hive we generally like to give bees candy ( or what is also known as bakers fondant or sugar cakes)

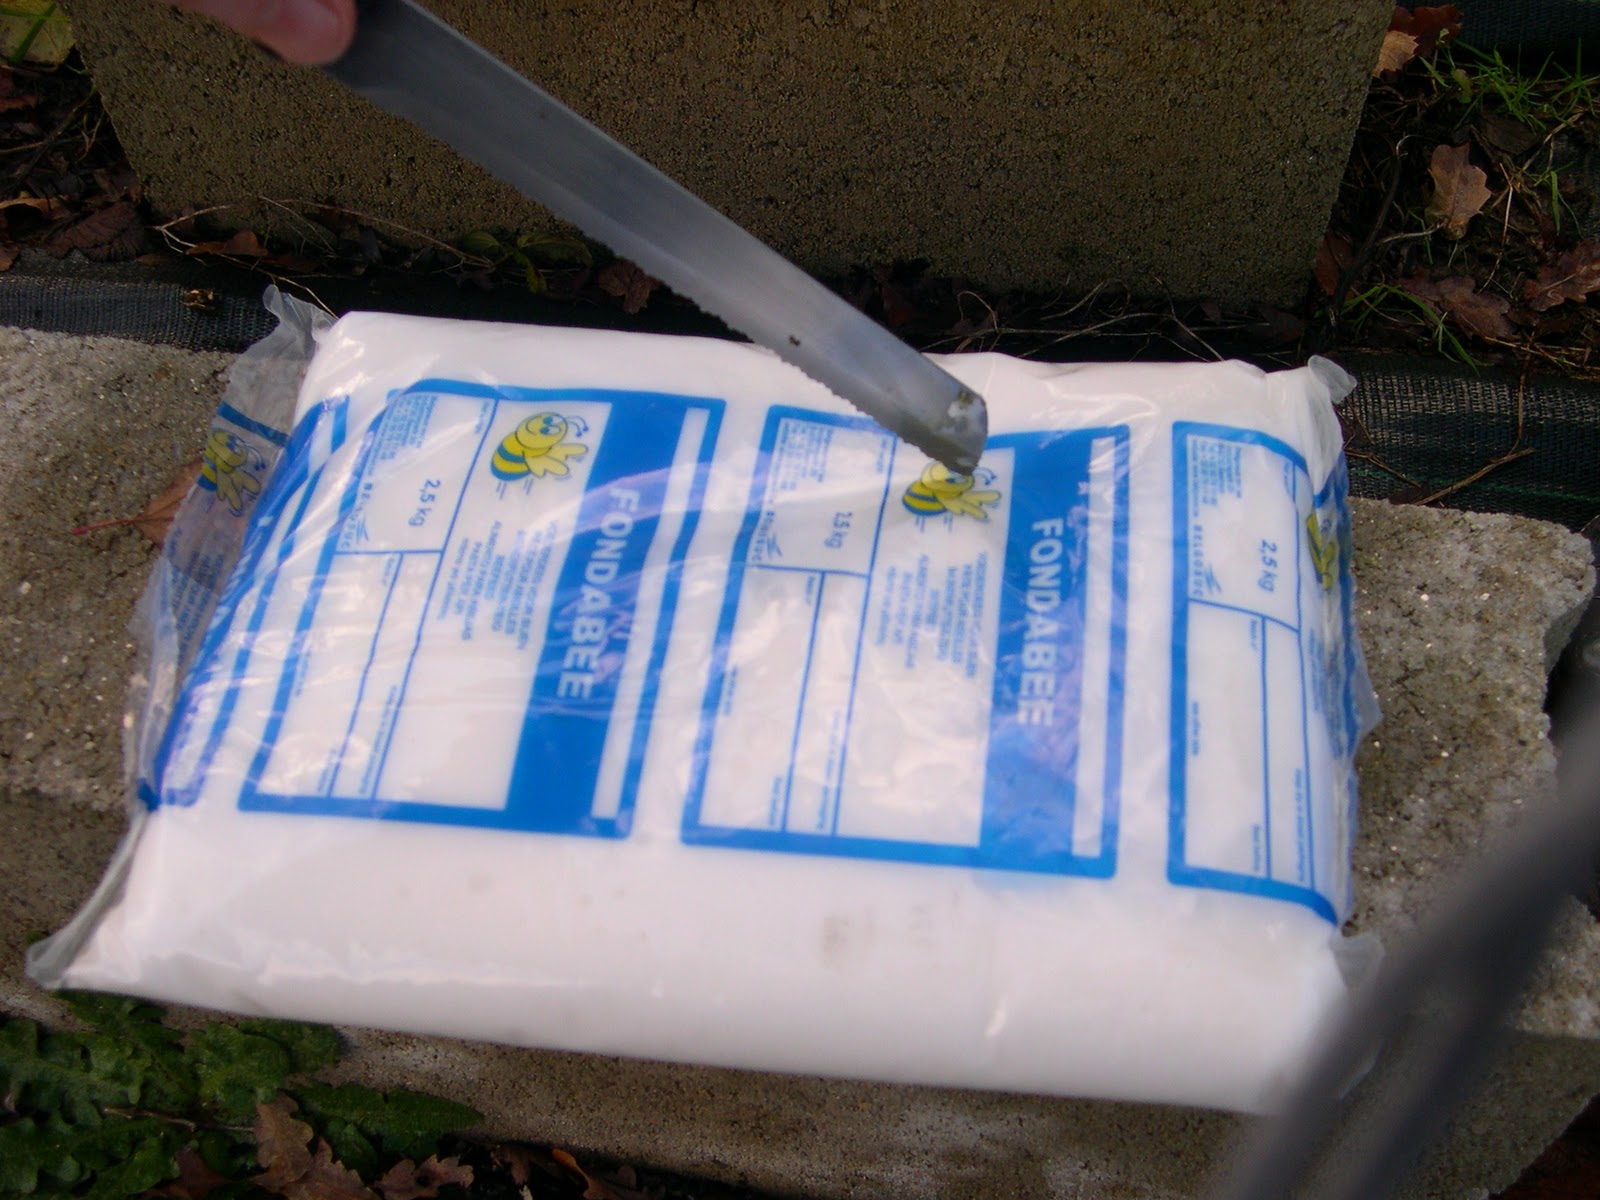
The beauty of this food is that it is soft enough for the bees to actually eat straight away but it is also low enough in water content that it stable within the hive. It will not ferment or go off before the bees consume it or move it around the hive to a place that is more accessible for them. The other very practical thing about sugar candy is that it is very easy to give it to the bees. A slab of this candy can be either placed on top of the hive over the feeder hole, directly in a feeder tray or even over a hole in the crown board or frame cover.

The most important thing about where you put  your sugar is that it is placed in the upper or top part of the hive. Logically heat rises. This is why most overwintering bees huddle together right in the upper middle of the hive and form a ball shape covering 2,3 or 4 frames depending on the size of the colony. The honey  that the bees have naturally  stored is within these frames and throughtout the rest of the hive but many a lost colony is through starvation.

When the weather gets really cold and we have a period of sustained temperatures below freezing the bees generally go in to a semi vegitative state, in which they consume less honey. This is  good for the management of stores but  the downside is that they are unable to relocate their managed stores through  the hive to places closer to where it may be needed as they become virtually immobile. It it  not uncommon to open a hive in early spring and find the bottom of the frames full of  honey and pollen and the top of the frame full of empty cells and bees that have died with their heads in a cell, in a desperate attempt to find sufficient sugar to eat to produce heat for the colony

We give sugar in a liquid form in september immediately after the honey harvest. This gives the bees time to dry it out further and create necessary stores for winter. We give further sugar candy to hives that are smaller in size and that may be more vulnerable to starvation for the reason above and also to colonies that as beekeepers we feel they may need a little more feed availible ie not a large colony, a late swarm or an under performing colony  during the previous season.

You can make your own bee candy but it can be a little tricky when you are making up large volumes. It is availible at your local bee store. I buy my own. I find it more economical and less time consuming and  it works out actualy quite cheap per hive.


The 3 pictures below demonstrates just how quickly bees get stuck in to their sugar.
This picture was taken in early January.


 Close up of the above picture.

 This picture below  was taken the middle of march.

 Method

If you want to look at your bees eating their way throught their candy cut a hole in the reveres side if the bag. This means that when you apply it to the hive or nuc you will be able to see through the clear plastic top of the bag and the writing on the bag stays underbeath on the frame cover side. 

Bag with hole cut in to the top and candy exposed.


Place the sugar on top of the hive . When ready slowly remove the plug in to the top frame cover. you should find this glued down by the bees in preparation for sealing off the hive for the winter. it will come out with a frame lever.

Once you have levered out the plug flip over the sugar slab and slide it in to position so the candy is in directly over the hole. You will probably not need a suit on for this if you are quiet and quick. Dont be alarmed if you dont see bees rushing around. Its December and they are pretty quiet this time of year.

Saturday, December 3, 2011

Putting together, Wiring and fitting wax sheet to Dadant Frames.

This is a standard Dadant frame for the body of a hive obviously in kit form.
The four pieces of wood are a frame top with a grove down the middle .Two sides with pre drilled holes for the wax support wire to thread through and a recangular bottom piece that basically holds the two sides apart when fitted together.


The first thing is to take the two side pieces  and in the two flat ends hammer in 2 x 40 mm panel pins (preferably galvanised for extra longevity)
Put them in nearly all the way through but at a slight angle as below,  in order that they are easier to hammer in and cross the joint in to the top frame at a stronger angle.

Place your top frame in a vice or similar holding  device with the grove down the middle facing upwards, holding the frame side as below , Hold it to the frame top at 90 degrees and hammer the two nails in. Try using a pin hammer. If the vice holds the top frame well you will find the nails go in smoothly and  quickly.


Complete the same with the other sides , creating  the u shape as above.
Next, take the bottom bar and place it between the un- attached ends of the two sides. There will be a nail sticking out of each end. Hammer these in one at a  time, using the vice as a base as support  while you work. This will make life easier.
You now should have a fully constructed unwired frame.

Place the frame back in the vice but this time upside down.Wire up the frame going in from one side , out the other , then up or down the frame depending on how the holes are configured for the frame you have.
Some Dadant frames have different configurations of wiring. The ones I use most often are wired horizontally. Some I have used are wired vertically . Whichever frame you have always make your start knot and end knot finish on either the sidebar ( in my case thats always the case)or the bottom bar. This is  very important when  fitting the wax sheet.
Use a pair of pliers to cut the wire and a pair of long nose pliers to tighten the end wire before tying it off. It saves your fingers and makes much tighter frames.
...
Wax sheets.

I buy my wax sheets ready made. They are sold by the kilo, but basically 50 sheets weigh 5 kilos and 50 sheets covers 50 frames. If you are making half sized frames for honey supers then all you do is cut one sheet in half, so 50 sheets in this case gives you 100 frames. I will be making some honey supers at a later date this winter.
In the picture above wax sheet in just sitting on the edge of the frame. I put it like this so you can see the groove that the wax sheet sits in its really simple.
The picture below shows the wax sheet just sitting in the groove.
I have shown this in detail so you can see how it all fits together. Its not rocket science but if you have never done it before you dont want to mess up too many sheets!


Next cut a piece of wood or ply at least 20mm thickness and just smaller than the inside of your frame by about 1cm each side. Place your wax sheet underneath your wired frame, and place the frame over the top of piece of wood . Now you are ready to melt the wires in to the wax.
Fixing in the sheet.
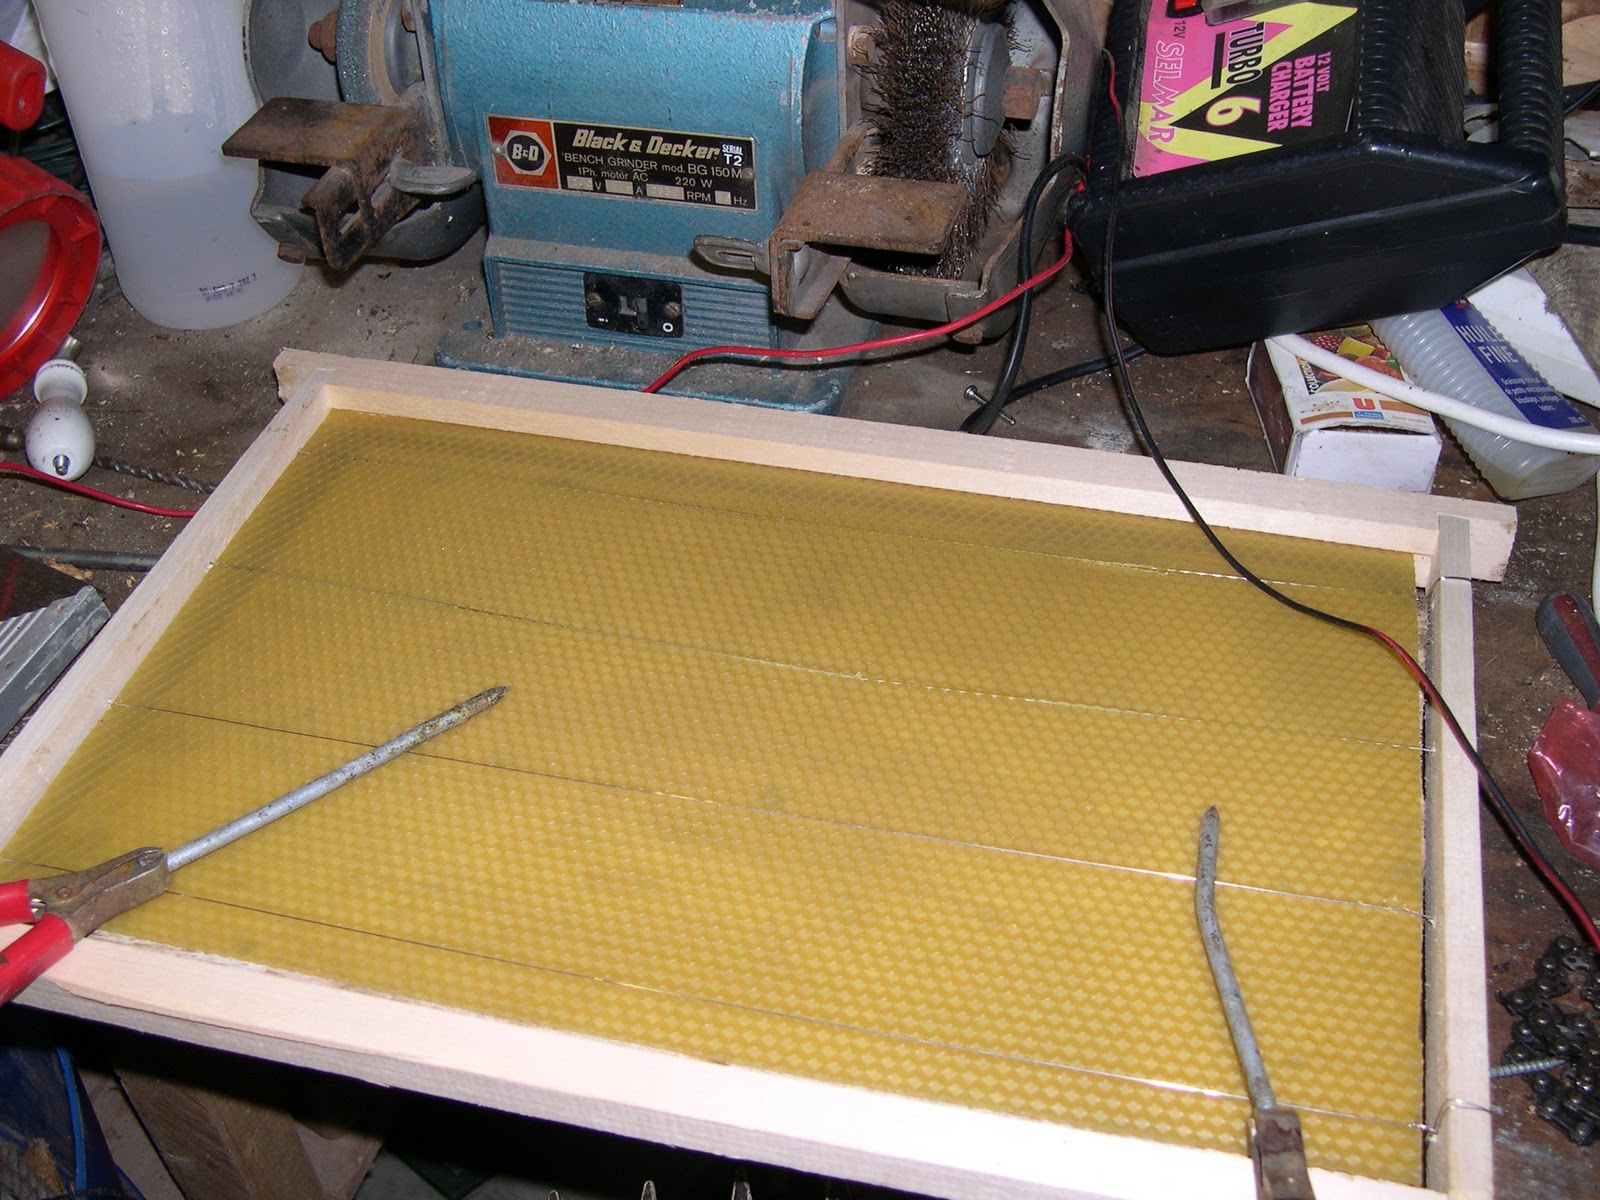
Its very difficult to describe this process but first you need to get hold of 12 v  battery charger. At the end of eack croccodile clip, clamp in a sharpened piece of metal. In my case I use 2 six inch nails and it works just fine.
The idea is that you put your 2 metal electrical probes on to  a piece of wire within the frame. You will need to leave at least  15 cms space between the 2 probes otherwise you find that  the wire heats up too quickly and its also likely that your wire will melt or actually stick on to the electrical probes, causing a short, the wire will get too hot and melt the sheet in half.  The best way is to touch the wire with one probe and have the other in your hand to lift away quickly when the wire becomes hot.  When you have done this  a few times you will self learn with you particular machine when to stop heating the wire.
When you have fiished the wire should generally be melted in to a position inside the sheet of wax. Sometimes it may appear more one side than the other but this dosent matter as long as the sheet is secured along each wire fairly universally throughout the frame.
The wood underneath the sheet actually will hold the sheet in place and apply a gently pressure between frame and wire while the proccess is complete. Its really simple and takes a little practice.


The wax sheet is now in position. The wires are fixed in to the wax.
Finally if you have some spare wax and a small bain-marie you can melt a small line of wax in to the jont between the frame.this will give you extra strength but Its not essential as the bees will do the same job in time.